Quantcast
Channel: Meal Planning Magic

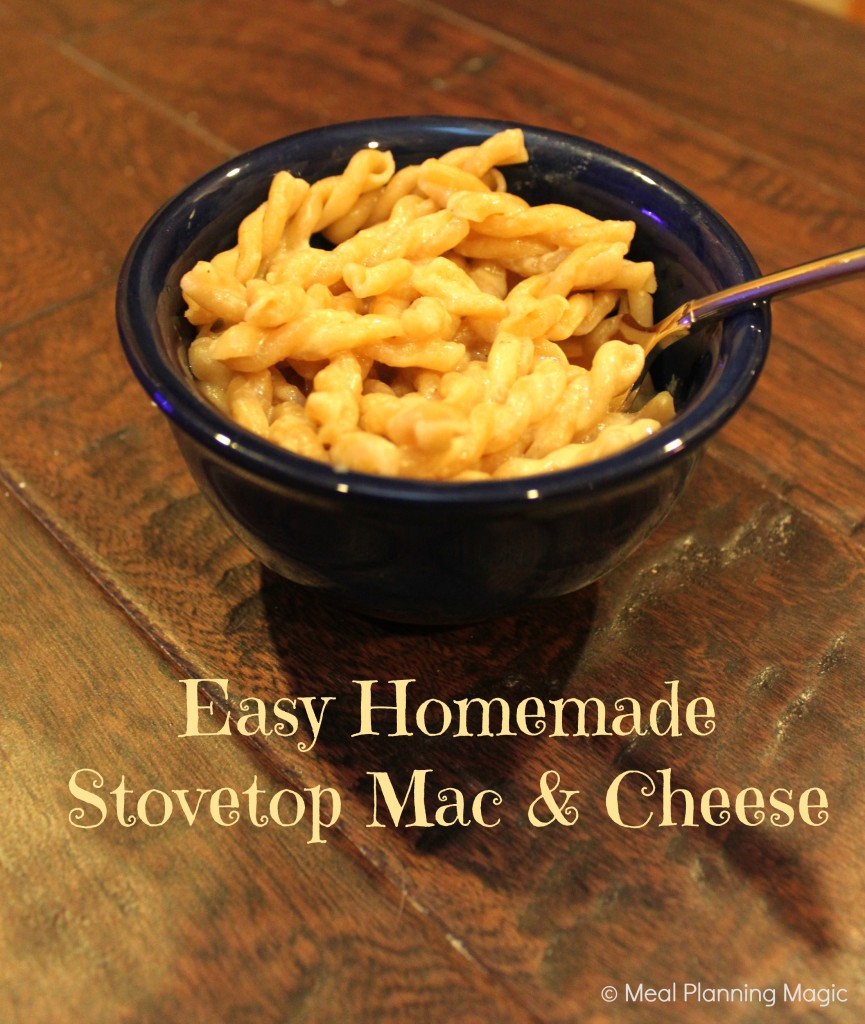
Easy Homemade Stovetop Mac and Cheese

$
0
0

Homemade Stovetop Mac and Cheese - freezer friendly too! | Recipe at MealPlanningMagic.com

I’ve been making a lot of macaroni and cheese this summer for lunches it seems. It’s a favorite and this version for Easy Homemade Stovetop Mac and Cheese is so easy and so much better for you than the boxed stuff! I first posted this recipe about two and a half years ago and over those years I’ve tweaked the recipe a bit to make it taste even more delicious and share those changes with you too. And I’ve updated the photos a bit also. Maybe you’re new here and you’re just discovering this recipe for the first time–lucky you!

My kids love macaroni and cheese. Shoot, I do too! I craved that stuff in the little blue box when I was pregnant with my son! But after I started learning what was in those box mixes, I decided I wanted to try and find a recipe that I could make from scratch. It was somewhat challenging to find a recipe that provided the convenience of the box mixes with the same creamy texture and flavor that we liked.

Several of the recipes I first tried included mustard but my family didn’t care for that flavor so I continued my search. Then I came upon a recipe for a basic cheese sauce and knew it would be a great start. I modified it a bit to make it better for pasta (and with more cheesy flavor) and it was a hit! What I also love about this recipe is that in the time it takes to boil the pasta, you can have the sauce made so that you’re ready to eat it when the pasta is cooked. I can generally have it done in about 15 minutes (depending on what type of pasta we choose). Now isn’t that almost just as easy as the boxed stuff? And so much better for you too because it’s made with real food ingredients.

Of course, you know I like to see if things freeze well so I can take it one step further to make meal prep even easier! So I tested this by freezing some of the leftover sauce and when I thawed and reheated it, it was just fine. Yay for extra simplicity. So feel free to make up a big batch of this sauce so you can freeze it into smaller portions for a quick and easy meal, side dish or yummy lunchbox option (put it a Thermos food jar and you’ll be good to go!)

I hope you enjoy this Easy Homemade Stovetop Mac and Cheese too!

Make this Homemade Stovetop Mac and Cheese in 15 minutes or less (for real!). The sauce is freezer friendly too! | Recipe at MealPlanningMagic.com

Easy Homemade Stovetop Mac & Cheese Recipe

  • 3 cups 1% low-fat milk (divided)
  • 1/3 cup all-purpose flour
  • 3/4-1 teaspoons salt
  • 2 cups sharp cheddar cheese (shredded)
  • ¼-½ teaspoon ground black pepper (to taste)
  • 16 oz. whole wheat pasta (gemelli or shells work well, uncooked)
  1. FOR SAUCE:
  2. Combine 1 cup milk and flour, using whisk to blend into a smooth mixture. Stir in remaining 2 cups milk and salt and bring to a boil over medium heat, stirring often to avoid burning or sticking. Turn heat to low and simmer for about 3 minutes, until slightly thickened, stirring constantly. Remove from heat and add shredded cheese and pepper, stirring until cheese is melted. Set aside.
  3. FOR PASTA:
  4. Cook pasta according to package directions. Drain and return to pot.
  5. FOR MAC & CHEESE:
  6. Add cheese sauce over cooked pasta in pan and serve.

Be sure to use SHARP cheddar cheese for the richest cheesy flavor. Other cheddar will work but we like the sharp cheese the best.

TIP! This sauce freezes well! Add to freezer safe containers, then label and freeze. When ready to use, thaw sauce over low heat in pot or in microwave until melted and warm, stirring well to recombine and make smooth. Add cooked pasta for a quick and easy meal or side dish!


Homemade Stovetop Mac and Cheese | Recipe at MealPlanningMagic.com

Be sure to whisk your milk mixture constantly to avoid burning. Remove from heat before adding the cheese and whisk it in–it will blend in easily!

Here’s the original picture in case you’ve found me on Pinterest from my original pin and are wondering if you’re in the right place!
Easy Homemade Stovetop Mac & Cheese Recipe | Meal Planning Magic

The post Easy Homemade Stovetop Mac and Cheese appeared first on Meal Planning Magic.


Super Simple Chocolate Black Cat Cookies

$
0
0

Chocolate Black Cat Cookies are a fun and easy homemade cookies recipe, perfect for celebrating Halloween. Get your kids into the kitchen to bake these chocolate cookies with you!

Click here to PIN this Super Simple Chocolate Black Cat Cookies recipe to Pinterest. 

This easy Halloween cookies recipe for Chocolate Black Cat Cookies is fun for kids to help with and a fun way to celebrate Halloween. Recipe at MealPlanningMagic. com

I originally shared this recipe here over 5 years ago and it’s just so simple and good I wanted to share it again with those of you that may not have seen it the first time around. I just made these again last week for a teacher appreciation luncheon and they were a hit! A photo of them even made the PTO’s Facebook page–ha! (they didn’t know who had made them–they were just in a collage of photos from the day).

Baking Chocolate Black Cat Cookies has been a tradition in our house every year since I can remember! I shared the black cat cookies recipe originally back in 2011 but I’ve updated the photos again.

They are a quick and easy Halloween treat that are fun for kids of all ages to help with, too. The original recipe is from a newspaper clipping my mom cut out many, many years ago and they were something we made when I was younger. And I’ve been making them ever since! A few years ago, I even won third place in a regional magazine’s recipe contest years ago! How fun is that?

This easy Halloween cookies recipe for Chocolate Black Cat Cookies is fun for kids to help with and a fun way to celebrate Halloween. Recipe at MealPlanningMagic. com

Now I make them with my own children and they are old enough to practically make them themselves–as a matter of fact, this year they did. They are by no means healthy, but a fun little treat for the holidays and they are SOOO easy!

Easy Black Cat Cookies for Halloween | #halloween | from MealPlanningMagic.com
Simple Chocolate Black Cat Cookies | #halloween | from MealPlanningMagic.com

I hope you and your kids love baking these chocolate black cat cookies.

This easy Halloween cookies recipe for Chocolate Black Cat Cookies is fun for kids to help with and a fun way to celebrate Halloween. Recipe at MealPlanningMagic. com
If you’re still looking for some Halloween week treats, be sure to check out my Halloween Pinterest board. Happy early Halloween and I hope you take some time to have a little fun in the kitchen with your family!

Easy Chocolate Black Cat Cookies

This easy Halloween cookies recipe for Chocolate Black Cat Cookies is fun for kids to help with and a fun way to celebrate Halloween. 

  • 1 box cake mix (chocolate or devil’s food flavor)
  • 1 cup creamy peanut butter (you could also substitute another nut butter or sun butter)
  • 2 large eggs
  • ¼ cup water
  • ½ cup granulated sugar
  • ¾ cup chocolate chips (for eyes)
  • 1 jar red hot candies or red mini-chocolate candies such as M&Ms (for nose–we prefer the M&Ms as they're easier to eat, especially for younger children)
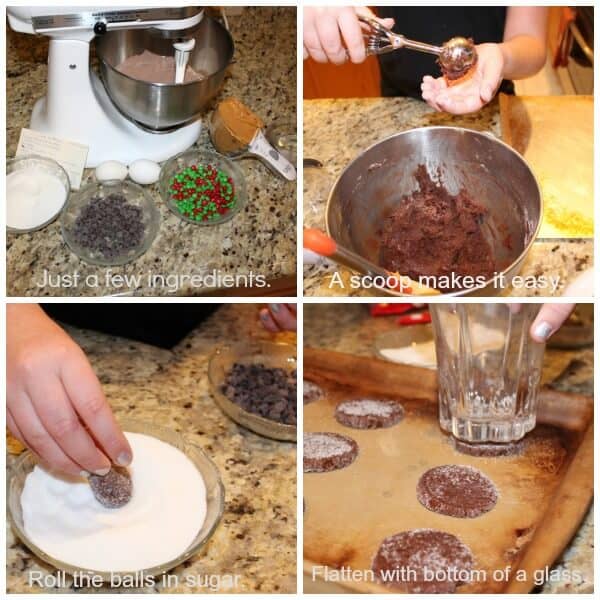
  1. Mix together peanut butter, cake mix, eggs and ¼ cup water. Add more water as needed if dough is too stiff. Roll dough into 1 ½” balls. Roll ball in sugar and place on cookie sheet. Then press ball flat with bottom of a glass. Form into cat faces by pinching two ears at the top of cookie. Use a fork to form the whiskers on either side of face. Add chocolate chips for the eyes and one red hot or red chocolate candy for the nose. Bake 7-8 minutes at 325º. Makes about 55 cookies


Have a question or want to share recipe ideas with others? Then join my private Facebook group, Meal Planning Magic Community Table here. If you’ve already joined, be sure to add your friends that may find it helpful too!

And don’t forget you can always follow me on Facebook, Twitter, Pinterest , Instagram or Google+. And don’t forget to sign up for my email list here so you never miss a new post! Each of these ways to connect all offer a little something different and are a great way to stay in the loop on new menu plans, recipe ideas, giveaways, organizing tips and more! Want to know what items I’m using in my own kitchen to help streamline my time there? Then check out my Amazon Shop (see disclaimer in footer below this post)


This easy Halloween cookies recipe for Chocolate Black Cat Cookies is fun for kids to help with and a fun way to celebrate Halloween. Recipe at MealPlanningMagic. com

The post Super Simple Chocolate Black Cat Cookies appeared first on Meal Planning Magic.

No Bake Chocolate Cherry Snack Bites

$
0
0

No Bake Chocolate Cherry Snack Bites are easy no bake cookies, made using just a few simple ingredients, including dried bing cherries, chocolate, and rolled oats!

Over five and half years ago I did a review for Naturebox snacks, a snack subscription service. They were just starting out and the idea of receiving wholesome, healthy snacks once a month sounded like a neat idea, especially for someone who doesn’t have a large selection of healthy food stores near them. It would even make a great gift!

I thought it was time I shared this No Bake Chocolate Cherry Snack Bites recipe with you all again. They have several recipes on their website using some of the snacks in their boxes and that’s when I first tried dried cherries. Now we buy our dried cherries at Costco and they’re one of my husband’s favorites to snack on alone or mix in with granola.

The combination of cherry and chocolate has always been one of my favorites like these Cherry Chocolate Cutout Sugar Cookies, Chocolate Covered Cherry Delight Cookies, Black Forest Brownies or Cherry Chocolate Kiss Cookies. There are lots to choose from!

I love that these No Bake Chocolate Cherry Snack Bites are full of all-natural ingredients like whole grain oats, banana, cocoa powder and peanut butter, plus dried cherries of course. Somehow these flavors all just seem to work really well together! I have modified the original recipe slightly to reduce the sugar slightly and a couple of other small changes to make them a bit more healthy.

You’ll want to store these in the refrigerator so they stay fresh. You can store them up to a week in the refrigerator (if they last that long!) They are so easy to make and freeze well too so you can make a big batch to have on hand any time!

Chocolate Cherry No-Bake Cookies

These little bites of chocolate, oats, cherries and bananas are just enough to satisfy that sweet tooth–a little more naturally!

  • 3 cups old fashion oats
  • 1 tsp vanilla
  • 1/2 cup dried cherries (finely chopped)
  • 1 very ripe banana (mashed)
  • 1/3 cup sugar
  • 1/2 cup milk of choice
  • 1/2 cup peanut butter
  • 1/4 cup cocoa powder
  1. in a medium saucepan, combine sugar, milk, peanut butter and cocoa.
  2. Continue to stir over medium heat until it comes to a slow boil.
  3. Allow the mixture to boil for about one minute and then remove from heat.
  4. Let the mixture cool for a minute or two, then add in the oats, banana, vanilla, and cherries and stir to combine.
  5. Using a mini cookie dough scoop, drop scoops onto a cookie sheet covered in waxed paper or with a silicon baking mat.
  6. Cool to room temperature or refrigerate.
  7. Store in refrigerator for up to one week or in freezer for up to 3 months.

If you are using just the scoop, your bites will come out a bit more blob like. That is ok!
But if you want them to look more roundish, use a scoop then roll with your hands and place on lined baking sheet to cool before storing.

For more snack bites like these No Bake Chocolate Cherry Snack Bites, be sure to check out my Cinnamon Raisin Peanut Butter Energy Bites or Peanut Butter Chocolate Energy Bites!

Have a question or want to share recipe ideas with others? Then join my private Facebook group, Meal Planning Magic Community Table here.

And don’t forget you can always follow me on Facebook, Twitter, Pinterest , Instagram or Google+. They all offer a little something different and are a great way to stay in the loop on new menu plans, recipe ideas, giveaways, organizing tips and more!

The post No Bake Chocolate Cherry Snack Bites appeared first on Meal Planning Magic.

Easy Copycat BLT Chicken Salad Sandwich

$
0
0

This BLT Chicken Salad Sandwich is a delicious combination of a classic chicken salad sandwich and a bacon, lettuce, and tomato sandwich. This easy sandwich recipe is perfect anytime!

image of BLT chicken salad sandwich

Pin this BLT Chicken Salad Sandwich recipe to Pinterest to remember to make it later!

A Classic Sandwich Combination: BLT Chicken Salad Sandwich

Several years ago when Starbucks expanded their menu to include breakfast and lunch options I was all over it. Truth be told, I don’t really go to Starbucks all that often but when I do, I like to try their new savory menu items. They all look so good (and many have tasted as good as they looked).

So those several years ago, one menu item that caught my eye was the BLT Chicken Salad Sandwich. If you’ve followed me for awhile you may have noticed I love this classic combo. I’ve shared other recipes like BLT Soup and One Pot BLT Pasta and BLT Egg Salad Sandwich.

image of sliced BLT chicken salad sandwich

Bacon, lettuce and tomato has long been one of my favorite sandwiches and mixing it with a chicken salad? Now that’s genius! When I originally posted this recipe in 2013, I searched online for a similar recipe but when I couldn’t find one, I decided to create my own.

It was really quite simple to prepare and it was a HUGE hit with my family. My son especially like the classic BLT combo. This BLT Chicken Salad recipe is definitely a keeper! I love that it also has a variety of healthy ingredients like tomatoes and lettuce. I like to use a lean bacon too. You can use a whole wheat bread but if you want to splurge a little bit go for a thick slice of crusty French bread.

image of ingredients for BLT chicken salad sandwich

Since originally posting this recipe, I’ve discovered a delicious BLT at of all places a Texas based chain convenience store called Buc-ees. (If you’re a Texan, you no doubt may already know about them—some of the cleanest bathrooms in the country!) They use Texas toast, thick cut pepper bacon, lettuce, tomato and a creamy mayonnaise.

I think the next time I make this BLT Chicken Salad Sandwich I may mix things up and add some pepper bacon and Texas toast to kick up the flavor! No matter how you make it, I hope you’ll love this sandwich as much as we do!

BLT Chicken Salad Sandwich

  • 2 cups shredded or cubed cooked chicken (I used leftover rotisserie chicken)
  • 6-8 strips of cooked bacon (diced)
  • 1 large tomato (diced)
  • 1/2 cup mayonnaise
  • Salt & Pepper to taste
  • 8 Romaine lettuce leaves
  • 8 slices whole wheat sandwich bread
  1. Combine chicken, bacon, tomato, mayonnaise, salt and pepper. Mix well and chill in refrigerator for about 30 minutes or longer to let flavors blend.
  2. Toast bread if desired.
  3. For each sandwich, layer lettuce and about 1/2 cup of chicken salad mixture. Top with another lettuce leaf and slice of bread.
  4. Enjoy!

image of BLT chicken salad sandwich

More Sandwich Recipes
If you like a good, simple sandwich or wrap, be sure to check out these other recipes here on my blog:
Bistro Style Steak and Onion Sandwich
Simple Caprese Panini (with Tomato, Basil and Fresh Mozzarella)
Simple Sauteed Vegetable Panini
Turkey Apple Honey Pecan Wrap
Super Simple Chicken Caesar Salad Wrap


Have a question or want to share recipe ideas with others? Then join my private Facebook group, Meal Planning Magic Community Table here. If you’ve already joined, be sure to add your friends that may find it helpful too!

And don’t forget you can always follow me on Facebook, Twitter, Pinterest , Instagram or Google+. And don’t forget to sign up for my email list here so you never miss a new post! Each of these ways to connect all offer a little something different and are a great way to stay in the loop on new menu plans, recipe ideas, giveaways, organizing tips and more! Want to know what items I’m using in my own kitchen to help streamline my time there? Then check out my Amazon Shop (see disclaimer in footer below this post)

Collage image of recipe index link

collage image of BLT chicken salad sandwich and ingredients

The post Easy Copycat BLT Chicken Salad Sandwich appeared first on Meal Planning Magic.

Simple Cinnamon Honey Roasted Garbanzo Beans

$
0
0

Simple Cinnamon Honey Roasted Garbanzo Beans are a delicious and nutritious snack idea perfect anytime.

Simple Cinnamon Honey Roasted Garbanzo Beans are a delicious and nutritious snack idea perfect for anytime.

Several years ago blogger challenges were all the thing and I used to host one myself called the Eating the Alphabet Challenge. It’s then that I first shared my recipe for Cinnamon Honey Roasted Garbanzo Beans. The challenge featured fruits, vegetables or beans each month we’d share a recipe that started with a different letter each month. I no longer host the challenge but many of the recipes I shared back then are worth resharing. So I’ve updated the photos and text here to reshare this recipe for you all–it may be totally new to many of you!

At the time, over five years ago, I hadn’t really heard of roasting garbanzo beans until my sister-in-law told me how much her kids love roasted garlic garbanzo beans. I decided to give a sweet spin on the snack and created this recipe for Cinnamon Honey Roasted Garbanzo Beans. Now you’ve probably seen many other recipes for roasted garbanzo beans but this is still one of my favorites!

Simple Cinnamon Honey Roasted Garbanzo Beans are a delicious and nutritious snack idea perfect for anytime.

This snack is SO simple to make and for those that are nut-free, a great alternative to the crunchiness that snacking on nuts can provide. For me, it took a little practice to get it just right on the crunchiness without them getting too hard. When you’re done, just store them in an airtight container until you’re ready for snacking. This snack makes a great addition to lunch boxes, after-school snacks or for healthy eating on the road.

Simple Cinnamon Honey Roasted Garbanzo Beans are a delicious and nutritious snack idea perfect for anytime.

A Delicious, Nutrition Packed Snack

We love using garbanzo beans to make homemade hummus but this is a tasty new way to try them. Garbanzo beans, also known as chickpeas, are packed with nutrition making these an even better snack to me! They are a great source of dietary protein and are rich in dietary fiber. One cup of garbanzo beans supplies almost half of the recommended daily allowance of dietary fiber! They’re full of vitamins and minerals too like manganese, folate and iron.

I hope you enjoy these Cinnamon Honey Roasted Garbanzo Beans as much as we do!
Simple Cinnamon Honey Roasted Garbanzo Beans are a delicious and nutritious snack idea perfect for anytime.

Roasted Cinnamon Honey Garbanzo Beans

  • 1 15 oz. can garbanzo beans (also called chickpeas)
  • 1 teaspoon ground cinnamon
  • 1 tablespoon granulated sugar
  • 2 teaspoons vegetable, canola or coconut oil (your choice)
  • 1 tablespoon honey
  1. Preheat oven to 375 degrees F.
  2. Drain and rinse garbanzo beans. Place beans on a towel to dry. You may pat them to dry. Let them air-dry about 15 minutes for extra crunchiness.
  3. In a small bowl, add cinnamon and sugar. Whisk together to combine then add oil and mix until blended. It will clump a bit but that’s ok. Add garbanzo beans and stir until beans are evenly coated. Spread out garbanzo beans on a large baking sheet. Bake for about 35-40 minutes, stirring every 10-15 minutes, until chickpeas are crunchy and no longer soft in the middle.
  4. Return hot, roasted chickpeas in a small bowl and coat evenly with honey. Spread garbanzo beans back out on baking sheet and allow to dry. Store in an airtight container at room temperature.

Simple Cinnamon Honey Roasted Garbanzo Beans are a delicious and nutritious snack idea perfect for anytime.

Looking for more healthy snack ideas? Be sure to check out these recipes too:
No Bake Chocolate Cherry Snack Bites
Super Simple Black Forest Trail Mix
Cinnamon Raisin Peanut Butter Energy Bites
Family Friendly Homemade Granola Bars
65+ Better For You Road Trip Snacks Recipe Roundup


Have a question or want to share recipe ideas with others? Then join my private Facebook group, Meal Planning Magic Community Table here.

And don’t forget you can always follow me on Facebook, Twitter, Pinterest , Instagram or Google+. And don’t forget to sign up for my email list here so you never miss a new post! Each of these ways to connect all offer a little something different and are a great way to stay in the loop on new menu plans, recipe ideas, giveaways, organizing tips and more! Want to know what items I’m using in my own kitchen to help streamline my time there? Then check out my Amazon Shop at https://www.amazon.com/shop/mealplanmom

Simple Cinnamon Honey Roasted Garbanzo Beans are a delicious and nutritious snack idea perfect for anytime.

The post Simple Cinnamon Honey Roasted Garbanzo Beans appeared first on Meal Planning Magic.

Quick and Easy Egg Bacon Avocado Breakfast Sandwich

$
0
0

Only four ingredients, this Quick and Easy Egg Bacon Avocado Breakfast Sandwich is a tasty, satisfying on-the-go breakfast option. And much of it can be made ahead too!

Only four ingredients, this Quick and Easy Egg Bacon Avocado Breakfast Sandwich is a tasty, satisfying on-the-go breakfast option. And much of it can be made ahead too

If you’ve been following me awhile, it’s no secret, breakfasts are a challenge in our house so it seems like I can never have enough simple recipe ideas. Sometimes I just need a meal that is easy to prepare and tastes good too like this Quick and Easy Egg Bacon Avocado Breakfast Sandwich. I originally shared this recipe back in the spring of 2014 but I’ve updated it a bit because it was worth sharing again and it needed some new photos.

The recipe featured pocket bread that is no longer made so I’ve also updated it to make it with sandwich thin bread. I like sandwich thin bread because it’s just enough to hold the ingredients and not be too much bread to filling ratio. Can you relate? When we have a sandwich we want to be able to taste what’s inside and not just all the bread!
It seems like avocados are a staple in our house so I love adding them to just about any meal I can. Actually, my family will eat them plain and just sliced we love them that much! I can usually find them for a great price (although it does vary depending on the season) at my local ALDI store.

Only four ingredients, this Quick and Easy Egg Bacon Avocado Breakfast Sandwich is a tasty, satisfying on-the-go breakfast option. And much of it can be made ahead too

With just four ingredients, you can do some of the prep ahead of time too. Scramble the eggs and bake (or fry) the bacon the night before then all you need to do is slice up the avocado and assemble everything before enjoying.

Only four ingredients, this Quick and Easy Egg Bacon Avocado Breakfast Sandwich is a tasty, satisfying on-the-go breakfast option. And much of it can be made ahead too

This Quick and Easy Egg Bacon Avocado Breakfast Sandwich is one of my favorite quick and easy breakfast recipes!

This is a great breakfast on-the-go idea but it would also make a simple lunch or dinner idea too. Add some fresh fruit too—yum!

  • 3 large eggs
  • 2-3 slices bacon, cooked
  • 1 ripe avocado, sliced
  • 2 sandwich thins bread (top & bottom counted as one unit)
  • salt & pepper to taste
  1. Break eggs into small bowl. With a fork or whisk, whip eggs until broken up and blended.

    In medium saute pan, scramble eggs. Remove from pan and set aside.

    In same medium satue pan, fry bacon until you reach desired doneness.

    Starting with one sandwich bread (top & bottom), add half the scrambled eggs, half the cooked bacon and half the sliced avocado. Add salt & pepper to taste. Top with other half of sandwich thin.

    Repeat with remaining ingredients.

Only four ingredients, this Quick and Easy Egg Bacon Avocado Breakfast Sandwich is a tasty, satisfying on-the-go breakfast option. And much of it can be made ahead too

If you like this recipe be sure to check out some of my other breakfast ideas like:
Simple Skillet Chilaquiles
Slowcooker Homemade Honey Cinnamon Granola
Cinnamon Chocolate Peanut Butter Overnight Oats
Overnight Apple Cinnamon Rolls
Peanut Butter Chocolate Banana Latte (aka Chicken Fried Latte) — funny name, tasty smoothie—trust me!
Have a question or want to share recipe ideas with others? Then join my private Facebook group, Meal Planning Magic Community Table here.

Have a question or want to share recipe ideas with others? Then join my private Facebook group, Meal Planning Magic Community Table here.

And don’t forget you can always follow me on FacebookTwitter, Pinterest Instagram or Google+. And don’t forget to sign up for my email list here so you never miss a new post! Each of these ways to connect all offer a little something different and are a great way to stay in the loop on new menu plans, recipe ideas, giveaways, organizing tips and more! Want to know what items I’m using in my own kitchen to help streamline my time there? Then check out my Amazon Shop at https://www.amazon.com/shop/mealplanmom (see disclaimer in footer below this post)

The post Quick and Easy Egg Bacon Avocado Breakfast Sandwich appeared first on Meal Planning Magic.

Peanut Butter Chocolate No Bake Energy Bites

$
0
0

Peanut Butter Chocolate No Bake Energy Bites are naturally sweetened with dates, peanut butter, and chocolate. This easy no bake recipe is a healthy snack option or even quick fuel for a busy morning.

Be sure to sign up for my email list to get new recipes and ideas in your inbox!

close up image of Peanut Butter Chocolate Energy Bites

I remember several years ago when “energy bites” were a new thing. What were these naturally sweetened balls of goodness that had protein packed ingredients and usually some sort of fruit? From the beginning, they were a hit with my family just like these Peanut Butter Chocolate No Bake Energy Bites.

Now, you’ve probably seen lots of those naturally sweetened snack bites or bars. Peanut butter and chocolate are a classic combo that I’ve loved forever. Peanut butter and chocolate are a classic combo that I’ve loved forever. I originally shared this recipe for Peanut Butter Chocolate No Bake Energy Bites back in 2013 but I’ve updated the post and photos just a bit to reshare it with you all.

Dates – A Healthier Natural Sweetener

Oftentimes, these type of snack bites or bars are sweetened with dates. Dates are a great choice because they are filled with natural fiber and are also an excellent source of iron and potassium. They are also rich in lots of minerals like calcium and manganese and many other anti-oxidants.

I can usually find the best prices on pitted, dried dates at a warehouse club like Costco or Sam’s Club. But I’ve also gotten them for a good price at Aldi or Sprouts too. Of course, your regular grocery store should have them in the dried fruit aisle also!

top view image of Peanut Butter Chocolate Energy Bites

When I originally developed this recipe it started with my (frequent) craving for something with peanut butter and chocolate. I couldn’t find a recipe that had just the right combination of ingredients, so I came up with my own, based on a compilation of some of the energy bar and energy bites recipes I had seen.

Peanut Butter and Chocolate- A Great No Bake Energy Bites Combination!

These little energy bites are SO delicious that I can’t stop eating them! They kind of remind me of a no bake cookie recipe I used to make growing up that are similar to this recipe for Cinnamon Chocolate Peanut Butter Overnight Oats.

image of Peanut Butter Chocolate Energy Bites held by fingers

My son LOVES these! He thinks he is getting a real treat just like cookies or brownies but I feel much better giving him one of these! My daughter liked them too, but thought the bites were a bit too rich, so my second batch was just a one-bite version. My husband didn’t care for them, but I realized later it’s probably because he does not like anything fudge-like—which these are very similar to. We especially like to eat them cold from the fridge.

Just a few simple, natural ingredients is all it takes to whip up these delicious, nutritious Peanut Butter Chocolate No Bake Energy Bites. I love that we can have a healthy, nutritious snack to enjoy any time. Be sure to check out my Roundup of Healthy Road Trip Snacks for even more ideas!

Peanut Butter Chocolate No Bake Energy Bites make up so quickly, I bet you’ll always want to have some of these healthy energy snacks on hand!

Sign up to receive an email in your inbox for each new recipe and get a FREE menu plan printable: FREE EMAIL SUBSCRIPTION

Peanut Butter Chocolate No Bake Energy Bites

Peanut Butter Chocolate No Bake Energy Bites are naturally sweetened with dates, peanut butter, and chocolate. This easy no bake recipe is a healthy snack option or even quick fuel for a busy morning.

  • 1 ½ cup dates (chopped)
  • ½ cup peanut butter
  • ½ cup unsweetened flaked coconut
  • 3 tablespoons unsweetened cocoa powder
  • ½ cup old-fashion oats
  1. In bowl of a food processor, add dates and peanut butter. Cover and blend until smooth, about 1 minute.
  2. Add coconut, cocoa powder and oatmeal until fully blended. The mixture will form a ball and be very sticky.
  3. Using a 1-inch scoop, form balls and place on baking sheet lined with silicone mat or parchment paper.
  4. Refrigerate at least 30 minutes before serving.
  5. May be kept in refrigerator for up to a week or frozen for up to three months.

Make ahead tip: Make these up and store in the refrigerator for up to two weeks or in freezer for up to three months. If frozen, allow to thaw slightly (about 10 minutes) at room temperature so they are easier to enjoy.

  Just a few simple, natural ingredients is all it takes to whip up naturally sweetened no bake energy bites.

Just a few simple, natural ingredients is all it takes to whip up these delicious, nutritious sweet bites.

Dates and peanut butter ready to be blended!

Dates and peanut butter ready to be blended!

blending dates and peanut butter in a food processor

Blend the dates and peanut butter first until a creamy mixture forms.

Mixing ingredients for peanut butter chocolate no bake energy bites

After you’ve blended the dates and peanut butter, add the rest of the ingredients. Just a few quick pulses is all it takes!

Using a scooper to help make rolling no bake energy bites into balls a bit easier.

Use a scooper to help make rolling into balls a bit easier.

Peanut Butter Chocolate No Bake Energy Bites - a healthy,, naturally sweetened snack.

All the balls are ready to be chilled then enjoyed!

More Recipes Like Peanut Butter Chocolate No Bake Energy Bites

If you like this recipe, be sure to check out these other simple snack ideas for on the go snacking!

Cinnamon Raisin Peanut Butter Energy Bites
No Bake Chocolate Cherry Snack Bites
Super Simple Black Forest Trail Mix
Whole Wheat Pepperoni Pizza Bites
Family Friendly Homemade Granola Bars

Have a question or want to share recipe ideas with others? Then join my private Facebook group, Meal Planning Magic Community Table here. If you’ve already joined, be sure to add your friends that may find it helpful too!

And don’t forget you can always follow me on Facebook, Twitter, Pinterest , or Instagram. And don’t forget to sign up for my email list here so you never miss a new post! Each of these ways to connect all offer a little something different and are a great way to stay in the loop on new menu plans, recipe ideas, giveaways, organizing tips and more! Want to know what items I’m using in my own kitchen to help streamline my time there? Then check out my Amazon Shop (see disclaimer in footer below this post)

Click on the photo below to browse more of my recipes! image of collage of recipe ideas from MealPlanningMagic.com

The post Peanut Butter Chocolate No Bake Energy Bites appeared first on Meal Planning Magic.

Whole Wheat Pepperoni Pizza Bites

$
0
0

Imagine a pepperoni pizza made into a bite-sized muffin and you’ve got Whole Wheat Pepperoni Pizza Bites. They’re perfect for lunch, snack or appetizer and can be made ahead too!

Stack of Whole Wheat Pepperoni Pizza Bites on a square white plate with pizza sauce on side.

WHY THIS RECIPE WORKS

I first started making these pepperoni pizza bites about ten years ago when my kids were younger. I changed up the original recipe I had and swapped out some of the all-purpose flour for whole wheat flour to make them a tad bit healthier.

They are like a little piece of pizza wrapped up in a mini-muffin sized snack. They are made from just a few simple ingredients which makes them so much better than the store-bought pizza bites, especially with the addition of whole wheat.

With just a handful of ingredients, most of which we usually have on hand, I love that they are so simple to make! They are perfect for lunches, an after school snack or as an appetizer for just about any occasion. They’re always a huge hit whenever I serve them.

HOW TO MAKE THIS RECIPE

Image of pepperoni pizza bites ingredients in bowls.

Here’s what you need to make these easy Whole Wheat Pepperoni Pizza Bites.

What ingredients go into Whole Wheat Pepperoni Pizza Bites?

Whole Wheat Flour – my original recipe called for only all-purpose flour but I like the addition of whole wheat. No one seemed to mind the change and they’re just as tasty.
All-purpose Flour – I like to use the unbleached all-purpose flour
Baking Powder – this helps them puff up and rise into their muffin like shape
Pizza seasoning herb blend – you can usually find this in the herbs and spices aisle of your grocery store. If not, you can substitute equal parts oregano, basil and garlic salt.
Skim milk – it works just fine in this recipe but if you prefer, you can use 1% or 2% also
2 large eggs
2 cups shredded mozzarella cheese – I like to buy my cheese in blocks and shred it myself in the food processor. This is a bit cheaper but if you prefer, the pre-shredded variety is ok too
4 ounces turkey pepperoni – You can usually find the turkey pepperoni slices next to the regular pepperoni in the grocery store. It has a lot less fat which means less grease and my family does not have a preference. But if you do, regular sliced pepperoni is ok too.

What are steps for making these Pepperoni Pizza Bites?

Collage image of ingredients for pepperoni pizza bites - dry ingredients in one bowl, wet in the other being whisked together.

Collage image of pepperoni pizza bites mixture in one bowl and using scoop for muffin tin before baking.

You won’t believe how easy these are to make! I use my handy chopper to chop up the pepperoni but a chef’s knife works just as well.

Then it’s just a matter of combining the dry ingredients and wet ingredients in separate bowls before mixing together. Whisking egg and milk together makes it easier to blend it all but if you want to keep it all to one bowl, it’s totally okay to skip that step. Stir in the shredded cheese and chopped pepperoni and let the mixture sit for 10 minutes.

I do also spray my non-stick muffin pans because these can get a little stuck in the pan if not!

I LOVE my mini scoops for all kind of things but it is so handy to use with this recipe so that your batter mixture is evenly distributed between the mini muffin cups. And in just 20 short minutes of baking, your pepperoni bites are ready to enjoy!

TIP: I sometimes need to use a mini rubber spatula around the edges to pop them out. Don’t let them sit too long in the pan and cool before removing otherwise they will be tougher to remove all in one piece!

WHOLE WHEAT PEPPERONI PIZZA BITES MAKE AHEAD TIPS

Can you prepare these ahead of time?

Yes! They are super easy to make ahead and perfect for that because then you can always shave some on hand for whenever you want to enjoy them.

Can you freeze them?

If we are not going to enjoy them right away, I will store them in labeled freezer safe container. You can use a ziptop bag. If you are using another container, use wax paper in between layers so they don’t stick together.

How do you reheat them?

My family like sto enjoy these pepperoni pizza bites for lunch or snacks. We just pull out the amount we want and warm up in the microwave for a couple of minutes. If you have more than four or five per serving, increase the time accordingly. I usually put it on 80% power setting so they don’t get tough when reheating.

HOW SHOULD I SERVE THESE?

We like to serve these pepperoni pizza bites with a simple pizza or marinara sauce or sometimes ranch dressing too. Maybe that’s a Texas thing! If you want to make up a batch of homemade ranch dressing, check out this post for Homemade Ranch Dressing.

The sauce for dipping is optional as I think they are good just on their own, too.
We sometimes like to dip them in ranch dressing too (I think that’s a Texas thing—I learned it in college to dip pizza in ranch dressing!) Just a few ingredients and so much better for you than the store-bought stuff!

My kids also liked packing these pizza bites in their lunches. We would just heat it up in the morning and send it in a pre-heated Thermos food jar and it will stay warm until lunchtime at school.

RELATED RECIPES

Sign up to receive an email in your inbox for each new recipe and get a FREE menu plan printable: FREE EMAIL SUBSCRIPTION


Whole Wheat Pepperoni Pizza Bites

Imagine a pepperoni pizza made into a bite-sized muffin and you’ve got Whole Wheat Pepperoni Pizza Bites. They’re perfect for lunch, snack or appetizer and can be made ahead too!

  • ¾ cup whole wheat flour
  • ¾ cup all-purpose flour
  • 1 ½ teaspoon baking powder
  • 1 teaspoon pizza seasoning (I buy mine from Penzey’s. If you do not have that you can substitute equal parts oregano, basil and garlic salt)
  • 1 ½ cup skim milk
  • 2 eggs (lightly beaten)
  • 2 cups shredded mozzarella cheese
  • 4 ounces turkey pepperoni (chopped into small pieces (about 1 ½ cups))
  • Prepared pizza sauce (optional)
  1. Preheat the oven to 375 degrees .
  2. Grease a 24-cup and one 12-cup mini-muffin pan. Set aside.
  3. In a large bowl, whisk together the flour, baking powder and seasoning. Set aside.
  4. In a small bowl, whisk together the milk and eggs. Add this to the flour mixture.
  5. Stir in the mozzarella and pepperoni.
  6. Let stand for 10 minutes.
  7. Re-stir the batter and divide among the mini-muffin cups.
  8. Bake until puffed and golden, 22 to 25 minutes.
  9. Serve the puffs and red pepper slices with the pizza sauce for dipping.

WHOLE WHEAT PEPPERONI PIZZA BITES MAKE AHEAD TIPS

Can you prepare these ahead of time?
Yes! They are super easy to make ahead and perfect for that because then you can always shave some on hand for whenever you want to enjoy them.

Can you freeze them?
If we are not going to enjoy them right away, I will store them in labeled freezer safe container. You can use a ziptop bag. If you are using another container, use wax paper in between layers so they don’t stick together.

How do you reheat them?
My family likes to enjoy these pepperoni pizza bites for lunch or snacks. We just pull out the amount we want and warm up in the microwave for a couple of minutes. If you have more than four or five per serving, increase the time accordingly. I usually put it on 80% power setting so they don’t get tough when reheating.

HOW SHOULD I SERVE THESE?

We like to serve these pepperoni pizza bites with a simple pizza or marinara sauce or sometimes ranch dressing too. Maybe that’s a Texas thing! If you want to make up a batch of homemade ranch dressing, check out this post for Homemade Ranch Dressing.

The sauce for dipping is optional as I think they are good just on their own, too.
We sometimes like to dip them in ranch dressing too (I think that’s a Texas thing—I learned it in college to dip pizza in ranch dressing!) Just a few ingredients and so much better for you than the store-bought stuff!

My kids also like packing these pizza bites in their lunches. We would just heat it up in the morning and send it in a pre-heated Thermos food jar and it will stay warm until lunchtime at school.

The post Whole Wheat Pepperoni Pizza Bites appeared first on Meal Planning Magic.


Simple Fish Tacos with Avocado, Corn and Tomato Salsa

$
0
0

Fish Tacos with Avocado, Corn and Tomato Salsa are a flavor packed, easy weeknight dinner. Make your taco night something special with this fish tacos recipe.

Be sure to sign up for my email list to get new recipes and ideas in your inbox!

image of white fish with corn, tomato and avocado salsa in tortilla on cutting board.

Tacos are practically a staple in our house. We LOVE them in all varieties including these Family Favorite Simple Greek Tacos. Tacos of any combo are my go-to meal on a busy night as they require minimal preparation. I like that we can customize the vegetables that go into tacos, even using seasonal ingredients. Mixing things up like that make them them just different enough to keep them from being too boring. 

Tacos like these Fish Tacos with Avocado, Corn and Tomato Salsa are a huge hit with my family. We’re big fans of avocados on just about everything and this salsa is super simple to whip up.
We even like to eat just by the spoonful as a side to all kinds of things, with chips for dipping—or on it’s own!

This week, I combined our two favorites and made a salsa with avocados and some fresh, seasonal vegetables, including tomatoes from our garden. Simple, fresh ingredients come together quickly for a great tasting garden-style salsa! 


Image of ingredients for corn, avocado and tomato salsa.

HOW TO MAKE THIS RECIPE

What goes into Fish Tacos with Avocado, Corn and Tomato Salsa?

Here’s what you need to make these simple fish tacos!

Avocado- In our part of Texas, avocados are a staple. I have found that ALDI’s or Costco consistently have the best prices, unless our grocery store puts them on sale. I usually buy them on the green side a few days before I plan to use them so they don’t get too overripe and mushy.

Tomato- If it’s summertime, we usually have tomatoes from our garden. Other times of the year, I will buy the cherry or grape tomatoes or Roma tomatoes for this recipe. They tend to have fewer seeds than larger tomatoes.
Corn- I have made this recipe with either fresh or frozen corn. Honestly, I find the frozen corn easier but if you have fresh on hand, go for it!

Cilantro- Fresh cilantro is available at most grocery stores. Again, I find that ALDI generally has the best prices in our area but even so, it’s still pretty cheap and adds a great punch of flavor!

Garlic– I use fresh or sometimes garlic in the jar—just depends on what I have on hand

Purple Onion– these onions are more mild in flavor which makes it great for this salsa

Cider Vinegar– you can find this type of vinegar in the same aisle as other vinegars and generally salad dressing or other condiments

Mild White Fish- I use a simple cod or tilapia in this recipe. I try to have fish on hand in the freezer at all times. I like to buy the bags from our wholesale club like Costco or Sam’s Club as the fish is a bit less expensive per pound.

And since it’s frozen right when it’s caught, it’s also fresher. We try to choose the wild caught fish when we can and I have found that the wholesale clubs’ pricing is usually better than the grocery store.

Flour or corn tortillas– Our preference are to use the fresh flour tortillas that you heat and make right before serving. But feel free to use your favorite type of tortilla!

Sour Cream (optional)- This recipe has no other dressing so we like to add a spoonful or so of sour cream to our fish tacos to get a bit of that creamy feel.


image of corn, avocado and tomato salsa ingredients in bowl

What are the steps for making Fish Tacos with Avocado, Corn and Tomato Salsa?

This recipe is SO quick and easy to make. Seriously, you can have these ready for the dinner table in about 20 minutes! You pretty much mix all the salsa ingredients together in a bowl and bake the fish.

Then combine the baked fish and salsa in a tortilla, top with some sour cream, serve and enjoy!

FISH TACO MAKE AHEAD TIPS:

Can you prepare it ahead of time?

This recipe is already so super easy but you can make the salsa ahead of time! Just combine all the ingredients in a bowl, cover and keep in the refrigerator until ready to serve.
I might do this in the morning before serving it for dinner but you can do it the day before. The avocado might get a little more brown but the cider vinegar helps prevent that. If you want, you can combine everything except the avocado and add that right before you serve it.

Can you freeze it?

While you can’t freeze the salsa as the textures of the vegetables will change (not for the better after thawing!), like I’ve mentioned, I do like to use frozen fish.

HOW SHOULD I SERVE IT?

Fish Tacos with Avocado, Corn and Tomato Salsa are a great all-in-one meal. You’ve got the lean fish and veggie filled salsa, we usually just enjoy them as is. You could also try adding some of my Cilantro Lime Rice though for a different twist!

If you love avocados and fish like we do, be sure to check out my  Super Simple Tomato Basil Topped Baked Fish or my Shrimp Avocado Salsa. If you love fish tacos as much as I do, check out some other varieties from some of my favorite bloggers like these Fish Tacos with Avocado Crema  or Cinco De Mayo Mexican Baja Grilled Fish Tacos or this deconstructed version, Fish Taco Bowls with Cilantro Lime Cream Sauce. So yummy! 

Sign up to receive an email in your inbox for each new recipe and get a FREE menu plan printable: FREE EMAIL SUBSCRIPTION

If you’ve try these Fish Tacos with Avocado, Tomato and Corn Salsa or any other recipe on the blog please let me know how much you enjoyed it by leaving a comment below and a rating. I love hearing from you! You can also Facebook, Twitter, Pinterest , or Instagram to see more delicious food and other ways to save time and money in the kitchen!

Fish Tacos with Avocados From Mexico, Corn and Tomato Salsa

Fish Tacos with Avocado, Corn and Tomato Salsa are a flavor packed, easy weeknight dinner. Make your taco night something special with this fish tacos recipe.

Salsa

  • 1 ripe avocado (diced, about one cup)
  • ½ cup fresh tomatoes (diced)
  • 2 cups frozen corn (or fresh works too! I have used corn cut off some leftover corn on the cob)
  • ¼ cup fresh cilantro (chopped)
  • 1 clove garlic (minced)
  • ¼ cup purple onion (diced)
  • 1 dash cider vinegar

For Tacos

  • 1 pound mild white fish (such as tilapia or cod)
  • 2 tablespoons all-purpose seasoning
  • 8 flour tortillas (or corn tortillas)
  • ½ cup sour cream
  1. Heat oven to 400 degrees F.

  2. In medium bowl, combine avocado, tomato, corn, cilantro, garlic, purple onion and cider vinegar.

  3. Cover and refrigerate until ready to serve. May be made up to one day in advance.

  4. Bake fish in preheated oven for 20 minutes or until done. If it easily flakes with a fork, it is done.

  5. To assemble taco, start with tortilla and add one half cooked fish filet on tortilla.

  6. Add about 1/4 cup of prepared salsa and one tablespoon sour cream to taste.

  7. Repeat for remaining ingredients.

  8. Fold up each taco and enjoy!

FISH PREPARATION:

If you prefer, you can also grill or pan fry the fish instead of baking. 

FISH TACO MAKE AHEAD TIPS:

Can you prepare Fish Tacos with Avocado Tomato and Corn Salsa ahead of time?

This recipe is already so super easy but you can make the salsa ahead of time! Just combine all the ingredients in a bowl, cover and keep in the refrigerator until ready to serve.
I might do this in the morning before serving it for dinner but you can do it the day before. The avocado might get a little more brown but the cider vinegar helps prevent that. If you want, you can combine everything except the avocado and add that right before you serve it.

Can you freeze it?

While you can’t freeze the salsa as the textures of the vegetables will change (not for the better after thawing!), like I’ve mentioned, I do like to use frozen fish.

Have a question or want to share recipe ideas with others? Then join my private Facebook group, Meal Planning Magic Community Table here. If you’ve already joined, be sure to add your friends that may find it helpful too!

And don’t forget you can always follow me on Facebook, Twitter, Pinterest , or Instagram. And don’t forget to sign up for my email list here so you never miss a new post! Each of these ways to connect all offer a little something different and are a great way to stay in the loop on new menu plans, recipe ideas, giveaways, organizing tips and more! Want to know what items I’m using in my own kitchen to help streamline my time there? Then check out my Amazon Shop (see disclaimer in footer below this post).

To discover many of my favorite items to make this recipe, click here to browse my Amazon shop.  Meal Planning Magic is a participant in the Amazon Services LLC Associates Program, an affiliate advertising program designed to provide a means for sites to earn advertising fees by advertising and linking to Amazon.com. Ordering products mentioned here are at no extra cost to you. Thank you for your support. 

The post Simple Fish Tacos with Avocado, Corn and Tomato Salsa appeared first on Meal Planning Magic.

Orange Peach Jack-O-Lantern Halloween Smoothie

$
0
0

This Halloween Orange Peach Smoothie is a fun fruit smoothie, made with orange juice, frozen peaches, and a boost of protein from the yogurt. Decorating the cups is fun also which makes this great choice for Halloween drinks for kids too!

Halloween is one of our all-time favorite holidays. We love to get into the spirit and have helped out at many local community events with haunted houses or even just planning fun activities in our neighborhood.

I know for many, Halloween can mean lots of candy at trick-or-treating time. Today I’ve got a more naturally sweet alternative that still has lots of Halloween fun! With a variety of frozen fruits available at the grocery stores year round, it’s easy to whip up an Orange Peach Smoothie anytime!

What Ingredients Do You Need For This Smoothie?

Orange Juice – we prefer the kind without pulp but use what you like!

Milk – you can use any milk you prefer—dairy or non-dairy. I used fat free milk in mine

Banana – The bananas that get the brown spots are great for smoothies because they get sweeter as they ripen!

Plain Yogurt – We prefer plain Greek yogurt but if that’s too tart for your taste, then vanilla yogurt can be substituted. I like to buy the large containers of Kirkland brand plain Greek yogurt at Costco.

Vanilla Extract – be sure to use the pure vanilla extract and not the imitation kind. The imitation extract can give this smoothie an “off” taste.

Honey – This recipe calls for one tablespoon of honey but if you like your smoothies a little sweeter, add up to two tablespoons.

Frozen Peaches –  you can find these in the frozen fruit section of the grocery store. In my store, they are near the frozen vegetables too.

How Do You Make These Halloween Orange Peach Smoothies?

This recipe uses frozen peaches which can be found in the frozen foods aisle of most grocery stores. With the extra ripe banana and honey paired with the orange juice, my kids say it reminds them of a sweet tart. The addition of the milk gives it a slightly frosty feel that is bursting with flavor!

For Halloween fun, have kids decorate clear plastic cups with a permanent marker and make fun faces or sayings on the cup. Great for parties—everyone can decorate their own cup! Or fun for your family too.

This Halloween smoothie is delicious any time of the year, but it is also a great way to have fun and eat well at the same time.

Enjoy your orange peach Halloween smoothie with a healthy snack, like Cinnamon Raisin Peanut Butter Energy Bites.

Orange Peach Smoothie in clear cups decorated for Halloween on orange plaid napkin.
Print

Halloween Orange Peach Smoothie

This Halloween Orange Peach Smoothie is a fun fruit smoothie, made with orange juice, frozen peaches, and a boost of protein from the yogurt. Decorating the cups is fun also which makes this great choice for Halloween drinks for kids too!
Course Beverage
Cuisine American
Keyword Orange Peach Smoothie
Prep Time 5 minutes
Total Time 5 minutes
Servings 2 servings
Calories 287kcal

Ingredients

  • 1 cup orange juice
  • 1 cup milk I used skim, sub with any milk you like though!
  • ½ cup plain yogurt
  • 1 teaspoon vanilla
  • 2 tablespoons honey
  • 1 medium ripe banana
  • 1 cup frozen peaches unthawed
  • 3 drops orange food coloring optional

Instructions

  • In pitcher of blender, combine orange juice, milk, yogurt, vanilla, honey and frozen peaches. Blend until smooth.
  • If you'd like a deeper orange color, add a few drops of orange food coloring until you reach the desired color.
  • Serve immediately.

Notes

Recipe tips for making Halloween Orange Peach Smoothie

For Halloween fun, have kids decorate clear plastic cups with a permanent marker and make fun faces or sayings on the cup. Great for parties—everyone can decorate their own cup!

Can you make this smoothie ahead?

Yes, sort of! You can make up smoothie kits with the ingredients but leave out the liquid.

What is a smoothie kit and can I freeze it?

Take a freezer safe container or bag and add the frozen peaches, banana, yogurt, honey and vanilla.
Label and date and store in the freezer for up to three months. When ready to prepare, take out kit and let it thaw for about 5 minutes in the pitcher of a blender. Add liquid ingredients and then blend.
Depending on the type of blender you have, you may need to let it thaw a bit longer. I have a Vitamix blender which is pretty powerful so it works ok for me. Sometimes I will do this while I’m preparing other breakfast or snack items. Just find what’s right for you!

Nutrition

Calories: 287kcal | Carbohydrates: 60g | Protein: 9g | Fat: 3g | Saturated Fat: 1g | Cholesterol: 10mg | Sodium: 82mg | Potassium: 892mg | Fiber: 3g | Sugar: 51g | Vitamin A: 847IU | Vitamin C: 72mg | Calcium: 237mg | Iron: 1mg

Have a question or want to share recipe ideas with others? Then join my private Facebook group, Meal Planning Magic Community Table here. If you’ve already joined, be sure to add your friends that may find it helpful too!

And don’t forget you can always follow me on Facebook, Twitter, Pinterest , or Instagram. And don’t forget to sign up for my email list here so you never miss a new post! Each of these ways to connect all offer a little something different and are a great way to stay in the loop on new menu plans, recipe ideas, giveaways, organizing tips and more! 

To discover many of my favorite items to make this recipe, click here to browse my Amazon shop.  Meal Planning Magic is a participant in the Amazon Services LLC Associates Program, an affiliate advertising program designed to provide a means for sites to earn advertising fees by advertising and linking to Amazon.com. Ordering products mentioned here are at no extra cost to you. Thank you for your support. 

The post Orange Peach Jack-O-Lantern Halloween Smoothie appeared first on Meal Planning Magic.


Latest Images