Quantcast
Channel: Meal Planning Magic
Viewing all 30 articles
Browse latest View live

Whole Wheat Pepperoni Pizza Bites

$
0
0

Whole Wheat Pepperoni Pizza Bites | MealPlanningMagic.com
Today I’m sharing some Super Eats for Game Day! Maybe you’ll be cheering on your favorite football team today and want a snack to enjoy while you do. I love this recipe for Whole Wheat Pepperoni Pizza Bites because they are super simple to whip up and so yummy too! They are like a little piece of pizza wrapped up in a mini-muffin sized snack. They are made from just a few simple ingredients which makes them so much better than the store-bought pizza bites, especially with the addition of whole wheat. These are great for any time you want a snack to share when you’re cheering on your favorite team whether that is football, basketball, baseball or whatever! They are an appetizer that can be served just about any time of the year. I actually like to make up a batch of these to keep in the freezer so I can heat them and send them with my kids in their lunches for school (I send them in a Thermos to keep them warm).

The pizza sauce for dipping is optional as I think they are good just on their own, too. We sometimes like to dip them in ranch dressing too (I think that’s a Texas thing—I learned it in college to dip pizza in ranch dressing!) If you want to make up a batch of homemade ranch dressing, check out this video where I show you how. Just a few ingredients and so much better for you than the store bought stuff!

So, now on to the recipe:

Whole Wheat Pepperoni Bites #SundaySupper
 
Ingredients
  • Whole Wheat Pepperoni Bites #SundaySupper
  • ¾ cup whole wheat flour
  • ¾ cup all-purpose flour
  • 1 ½ teaspoon baking powder
  • 1 teaspoon pizza seasoning (I buy mine from Penzey’s. If you do not have that you can substitute equal parts oregano, basil and garlic salt)
  • 1 ½ cup cup low-fat milk
  • 2 eggs, lightly beaten
  • 2 cups shreded mozzarella cheese
  • 2 cups pepperoni, chopped into small pieces (one 4 oz. pkg will yield about 1 ¼-1/2 cups
  • Prepared pizza sauce, optional
Instructions
  1. Directions
  2. Preheat the oven to 375 degrees .
  3. Grease a 24-cup and one 12-cup mini-muffin pan. Set aside.
  4. In a large bowl, whisk together the flour, baking powder and seasoning. Set aside.
  5. In a small bowl, whisk together the milk and eggs. Add this to the flour mixture.
  6. Stir in the mozzarella and pepperoni.
  7. Let stand for 10 minutes.
  8. Re-stir the batter and divide among the mini-muffin cups.
  9. Bake until puffed and golden and they spring back when you touch them, about 22 to 25 minutes.
  10. Let them cool in pan for 2-3 minutes then remove to rack.
  11. Serve warm with the pizza sauce for dipping, if desired.
Whole Wheat Pepperoni Pizza Bites | MealPlanningMagic.com

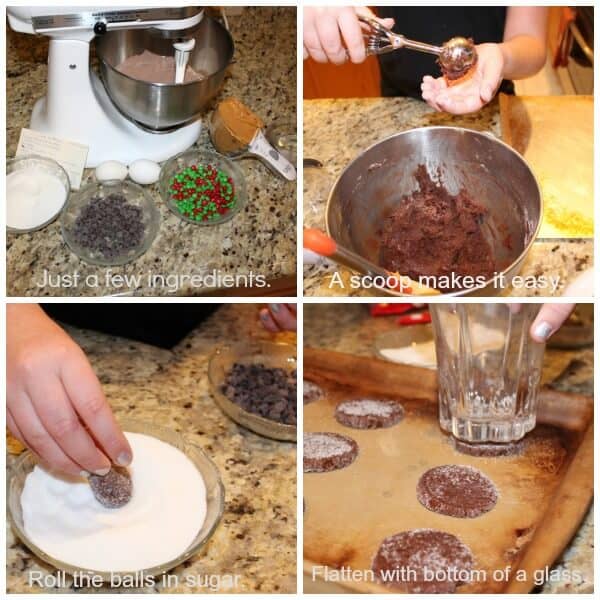
Just a few simple ingredients is all it take (not shown in top pic is the milk–whoops!) Whisking egg and milk together makes it easier. I spray even my non-stick muffin pans because these can get a little stuck in the pan if not!

Whole Wheat Pepperoni Pizza Bites | MealPlanningMagic.com

I like to use a scoop to put the batter in the cups. Chopping the pepperoni is easier with my chopper! I sometimes need to use a knife around the edges to get them out–don’t let them sit too long in the pan and cool before removing!

Whole Wheat Pepperoni Pizza Bites | MealPlanningMagic.com
This week, I’m sharing my recipe with the Sunday Supper group. It’s been awhile since I’ve participated in a Sunday Supper round up. But I’m excited to see all the recipes shared this week! If you’re not familiar with #SundaySupper, the idea is that we all need to take the time, even if it’s just once a week, to get back to the family dinner table and share our time with family. For generations before ours, it was a weekly tradition and it’s something that we hope to make a tradition once again in households across the globe.

Make sure you check out all the Game Day deliciousness we are sharing this Sunday!

Game Day Appetizers:

Game Day Entrees:


Game Day Desserts:


Game Day Desserts:


Sunday Supper Movement

Join the #SundaySupper conversation on twitter every Sunday! We tweet throughout the day and share recipes from all over the world.

Our weekly chat starts at 7:00 pm ET. Follow the #SundaySupper hashtag and remember to include it in your tweets to join in the chat.

Check out our #SundaySupper Pinterest board for more fabulous recipes and food photos.

Would you like to join the Sunday Supper Movement? It’s easy! You can sign up by clicking here: Sunday Supper Movement.

The post Whole Wheat Pepperoni Pizza Bites appeared first on Meal Planning Magic.


Dr. Praeger’s Little Bites for Kids #ad

$
0
0

Thank you to Dr. Praeger’s Littles for sponsoring this post.

Dr. Praeger's Little Bites | #sponsored

When it comes to getting good food on the table for our families, sometimes it’s difficult to find the time to make everything from scratch. That’s why I like to have a few real food options that I can purchase at the grocery store but still feel good about serving to my family. Dr. Praeger’s line of Littles for Kids does just that. They’ve been making frozen food options for the whole family for over 20 years! Recently, we tried several of the little bites which included the Broccoli Littles, Sweet Potato Littles and Lightly Breaded Fishies. I paired them with some homemade tomato soup and we had the best of both worlds for an easy Sunday night supper as we were winding down our weekend.

I’ll be honest, my family were a bit skeptical about the Broccoli Littles but they all tried and ended up really liking them! My non-broccoli loving husband even really enjoyed them and that is saying a lot! Our favorite was the Fishies. They have just the perfect amount of crunch on the outside and delicious fish flavor on the inside. They are rice crusted so perfect for those who are gluten free, too! Actually, all of the products we tried were gluten free and so yummy. The Broccoli and Sweet Potato Littles are also GMO free–bonus! The fun shapes make them appealing to kids and as a parent, you can feel good knowing that what’s in them is just as appealing. They’re made with all natural ingredients that you can actually pronounce too!

For example, the Rice Crusted Fishies include: Minced Alaskan Pollock (wild), rice crust (rice flour, whole amaranth flour, yellow corn meal, corn starch, salt, dextrose, raisin juice concentrate, honey, expeller pressed canola oil, garlic powder, onion powder, yeast extract, spice), potato flakes, potatoes, expeller pressed canola oil, salt, garlic, brown sugar, black pepper. See? All real foods!
drpraegers-product

Dr. Praeger’s Sensible Foods  has been around for twenty years so they’ve got this all natural yet convenient frozen products thing down. Started by two New Jersey cardiothoracic doctors, they’re actually a leader in the all-natural, vegetarian, vegan, gluten free, and kosher frozen food categories! You can find Dr. Praeger’s at many nationwide grocery stores like Trader Joe’s, Costco, Whole Foods and even Safeway stores but you can also check their store locator to find other regional stores in your area that carry them. They actually have a whole line of all natural foods–not just for kids like veggie burgers and veggie pancakes. In my local Whole Foods store, they have the kids items in one section and the more grown-up selections in another part of the frozen food aisle so be sure to look around (or ask a store employee like I did) when you are searching for these products!

Disclaimer: I received samples and compensation for this post but all opinions are my own.

The post Dr. Praeger’s Little Bites for Kids #ad appeared first on Meal Planning Magic.

Easy Homemade Stovetop Mac and Cheese

$
0
0

Homemade Stovetop Mac and Cheese - freezer friendly too! | Recipe at MealPlanningMagic.com

I’ve been making a lot of macaroni and cheese this summer for lunches it seems. It’s a favorite and this version for Easy Homemade Stovetop Mac and Cheese is so easy and so much better for you than the boxed stuff! I first posted this recipe about two and a half years ago and over those years I’ve tweaked the recipe a bit to make it taste even more delicious and share those changes with you too. And I’ve updated the photos a bit also. Maybe you’re new here and you’re just discovering this recipe for the first time–lucky you!

My kids love macaroni and cheese. Shoot, I do too! I craved that stuff in the little blue box when I was pregnant with my son! But after I started learning what was in those box mixes, I decided I wanted to try and find a recipe that I could make from scratch. It was somewhat challenging to find a recipe that provided the convenience of the box mixes with the same creamy texture and flavor that we liked.

Several of the recipes I first tried included mustard but my family didn’t care for that flavor so I continued my search. Then I came upon a recipe for a basic cheese sauce and knew it would be a great start. I modified it a bit to make it better for pasta (and with more cheesy flavor) and it was a hit! What I also love about this recipe is that in the time it takes to boil the pasta, you can have the sauce made so that you’re ready to eat it when the pasta is cooked. I can generally have it done in about 15 minutes (depending on what type of pasta we choose). Now isn’t that almost just as easy as the boxed stuff? And so much better for you too because it’s made with real food ingredients.

Of course, you know I like to see if things freeze well so I can take it one step further to make meal prep even easier! So I tested this by freezing some of the leftover sauce and when I thawed and reheated it, it was just fine. Yay for extra simplicity. So feel free to make up a big batch of this sauce so you can freeze it into smaller portions for a quick and easy meal, side dish or yummy lunchbox option (put it a Thermos food jar and you’ll be good to go!)

I hope you enjoy this Easy Homemade Stovetop Mac and Cheese too!

Make this Homemade Stovetop Mac and Cheese in 15 minutes or less (for real!). The sauce is freezer friendly too! | Recipe at MealPlanningMagic.com

Easy Homemade Stovetop Mac & Cheese Recipe
Author: 
Cook time: 
Total time: 
 
Ingredients
  • 3 cups 1% low-fat milk, divided
  • ⅓ cup all-purpose flour
  • ¾-1 teaspoons salt
  • 2 cups sharp cheddar cheese, shredded
  • ¼-½ teaspoon ground black pepper, to taste
  • 16 oz. whole wheat pasta (gemelli or shells work well), uncooked
Instructions
  1. FOR SAUCE:
  2. Combine 1 cup milk and flour, using whisk to blend into a smooth mixture. Stir in remaining 2 cups milk and salt and bring to a boil over medium heat, stirring often to avoid burning or sticking. Turn heat to low and simmer for about 3 minutes, until slightly thickened, stirring constantly. Remove from heat and add shredded cheese and pepper, stirring until cheese is melted. Set aside.
  3. FOR PASTA:
  4. Cook pasta according to package directions. Drain and return to pot.
  5. FOR MAC & CHEESE:
  6. Add cheese sauce over cooked pasta in pan and serve.
Notes
Be sure to use SHARP cheddar cheese for the richest cheesy flavor. Other cheddar will work but we like the sharp cheese the best.

TIP! This sauce freezes well! Add to freezer safe containers, then label and freeze. When ready to use, thaw sauce over low heat in pot or in microwave until melted and warm, stirring well to recombine and make smooth. Add cooked pasta for a quick and easy meal or side dish!

 
Homemade Stovetop Mac and Cheese | Recipe at MealPlanningMagic.com

Be sure to whisk your milk mixture constantly to avoid burning. Remove from heat before adding the cheese and whisk it in–it will blend in easily!

Here’s the original picture in case you’ve found me on Pinterest from my original pin and are wondering if you’re in the right place!
Easy Homemade Stovetop Mac & Cheese Recipe | Meal Planning Magic

The post Easy Homemade Stovetop Mac and Cheese appeared first on Meal Planning Magic.

Whole Wheat Banana Bread

$
0
0

Whole wheat banana bread is filled with tons of banana flavor, and is a great way to use up over ripe bananas! This quick bread recipe is perfect for breakfast or an anytime snack!

Whole Wheat Banana Bread | MealPlanningMagic.com

Well, I had hoped to bring you a cold Avocado Chile Soup recipe for this first month of the 2014 Eating A to Z Healthy Recipe Challenge, but it hasn’t happened yet. Instead I’m sharing with you this super yummy Whole Wheat Banana Bread recipe. I really wanted the soup to work, but guess I didn’t give myself enough time to experiment. You see, there is a local restaurant that has a delicious soup, but the version I made tasted more like a smoothie than a soup and just wasn’t the same. I’ll keep trying!

Now, on to the Whole Wheat Banana Bread!

I’ve tried many a banana bread recipes over the years, but this one is moist and delicious and full of banana flavor. Plus, it’s filled with whole wheat goodness! It’s a recipe that I modified from another one I found online and our family loves it. I’m not sure about you, but I always seem to have some bananas that are nearing the over ripe stage, so this is a great way to use them up! (Did you also know you can freeze bananas? I like to peel them and put into a silicone muffin cup on a baking sheet to freeze. Then pop them out and store in a ziptop storage bag).

If you have any of the whole wheat banana bread left over, you can slice it and freeze it! Then thaw for a quick breakfast or snack anytime.

Bananas are a favorite fruit around hour household! They are great in a smoothie, sliced over a bowl of granola, as a quick, healthy snack and in so many other delicious recipes. A good source of potassium,dietary fiber, manganese and vitamins B6 & C all in an easy-to-carry package, bananas are a no-brainer to add to just about anyone’s diet!

Now on to the recipe for the Whole Wheat Banana Bread! Here it is:

Whole Wheat Banana Bread
 
Ingredients
  • 1 cup whole wheat flour
  • 1 cup all-purpose flour
  • 1 teaspoon baking soda
  • ½ teaspoon cinnamon
  • ¼ teaspoon salt
  • ½ cup butter
  • ¾ cup brown sugar
  • 2 eggs, beaten
  • ½ teaspoon vanilla
  • 2½ cups mashed overripe bananas (about 5-6 medium sized bananas)
Instructions
  1. Preheat oven to 350 degrees F.
  2. Lightly grease a 9x5 inch loaf pan.
  3. In a medium bowl, combine flours, baking soda, salt and cinnamon; set aside. In a separate large bowl, cream together butter and brown sugar.
  4. Add vanilla.
  5. Stir in eggs and mashed bananas until well blended. Add flour mixture to banana mixture and stir just to moisten. Do not over mix or bread will be too dense. Pour batter into prepared loaf pan.
  6. Bake in preheated oven for 65-70 minutes, until a toothpick inserted into center of the loaf comes out clean.
  7. Let bread cool in pan for 10 minutes, then turn out onto a wire rack.
  8. Enjoy!

Whole Wheat Banana Bread - ingredients | MealPlanningMagic.com

Whole Wheat Banana Bread - this recipe is a great way to use up over ripe bananas! | MealPlanningMagic.com

What’s your favorite way to enjoy banana bread? I hope you’ll give this recipe a try!

Eat A to Z Healthy Recipe Challenge | Monthly Blog Hop Hosted by MealPlannignMagic.com, AlidasKitchen.com and SparklesAndAStove.com
You can find all the details about how to join the Eat A to Z Challenge by clicking here. I’m excited to be co-hosting this challenge this year with Alida from Alida’s Kitchen and Kathy from Sparkles and a Stove.

Don’t forget to check out the Eat A to Z Pinterest board. There you can keep track of all the recipes that are added month-to-month but also find new recipes from last year too. What’s your favorite fruit, vegetable, grain or legume that starts with the letter A or B?

Be sure to check out all the other blogs shown in the link up below to discover new recipes and ideas! If you’re a blogger and have a recipe to link up, I can’t wait to see what you share!


Don’t want to miss any more recipe ideas? Be sure to SIGN UP HERE to receive updates via email or RSS feed (you can choose the reader you prefer!) And don’t forget you can always follow me on Facebook, Twitter, Pinterest or Instagram. They all offer a little something different and are a great way to stay in the loop on new menu plans, recipe ideas, giveaways, organizing tips and more!

The post Whole Wheat Banana Bread appeared first on Meal Planning Magic.

Egg Bacon Avocado Pocket Sandwich

$
0
0

Egg bacon avocado pocket sandwiches are a delicious and simple meal to make for breakfast, lunch, or even a light dinner.

Disclaimer: This post is a sponsored post for which I was compensated monetarily and with product. All opinions are, however, my own.

Egg, Bacon and Avocado Pocket Sandwich | #ad | MealPlanningMagic.com
I don’t know about you, but it seems like I can never have enough simple meal ideas. Whether it’s for lunch or for a quick dinner or breakfast on-the-go, sometimes I need a meal that is easy to prepare and tastes good too.

I recently tried Oroweat® Pocket Thins® Flatbread which is super easy to fill with just about anything.  I decided to try them for breakfast and made up some scrambled eggs and bacon (which I then chopped up) and sliced up some avocados. A delicious egg bacon avocado pocket sandwich!

I added them all to my Pocket Thins® Flatbread and drizzled on a little salsa for a super easy breakfast. My daughter especially loved them and these will be a regular on our breakfast menu. What I love about the Pocket Thins® Flatbread is that unlike a tortilla, all the ingredients you put in, stay in while you’re eating them! (no more spilling out the back end!) They’re also great filled with egg salad, rolled up sliced lunchmeat and cheese with some sliced vegetables like cucumbers or tomatoes and maybe some torn lettuce pieces. Drizzle in your favorite salad dressing and voila! You’ve got an easy to eat, light lunch or dinner.

Both of my kids also enjoyed the Oroweat® Sandwich Thins® we tried. My son made a classic peanut butter and jelly for lunch (which I think he has had every day since we opened the package) and my daughter took one half of the thin to school one day to roll up with a slice of cheese and a hot dog for her lunch.

Let me tell you, those Sandwich Thins® didn’t last long in this house! (as you can see from the package–they were gone before I could take a picture!)

The egg bacon avocado pocket sandwich is now one of my favorite quick and easy breakfast recipes!

Egg, Bacon and Avocado Pocket Sandwich | #ad | MealPlanningMagic.com

Did you know that all Arnold®, Brownberry® and Oroweat® Sandwich Thins® Rolls are cholesterol-free foods, containing zero grams of Trans Fat and no high fructose corn syrup? And they all only have 3 PointsPlus VALUE® for Weight Watchers! I got the 100% Whole Wheat versions.

Here’s a little more info. about these products:

Arnold®, Brownberry® and Oroweat® Sandwich Thins® Rolls come in 100% Whole Wheat, Healthy Multi-grain, Honey Wheat, Flax and Fiber. Official Pocket Thins® come in 100% Whole Wheat, Healthy Multi-grain. And Thomas’® Bagel Thins® Bagels come in Plain, 100% Whole Wheat, Cinnamon Raisin and Everything. (We especially like the Cinnamon Raisin toasted then spread with a little butter or cream cheese or whole wheat with sliced lunchmeat, cheese and tomatoes and lettuce–yummy!)

Be sure to check out their websites for more Recipe Ideas by clicking here or also here.  Or follow them on Facebook at Sandwich Thins® on Facebook or Bagel Thins ® on Facebook

What would you put in or on your Pocket Thins® or Sandwich Thins®?

Disclaimer: Sandwich Thins®, Pocket Thins® and Bagel Thins ® provided me with coupons for free product and a gift card for my recipe ingredients. All opinions are my own.

The post Egg Bacon Avocado Pocket Sandwich appeared first on Meal Planning Magic.

Easy Homemade Tomato Basil Parmesan Soup

$
0
0

Homemade tomato basil soup is not only less expensive than canned soup, it’s also better for you! Skip the cans and make this easy homemade soup recipe!

homemade-tomato-soup-with-words

Ever since I discovered how easy it is to make homemade tomato basil soup, it has become a favorite around our house. We especially like to have homemade tomato basil soup on Sunday evenings after a busy weekend. It’s so simple and quick to whip up and then we pair it with grilled cheese sandwiches–super yum!

I tweaked a recipe inspired by Jenny Hobick’s Everyday Occasions blog to create this Easy Homemade Tomato Basil Parmesan Soup and once you try it, you may never go back to the premade canned stuff! We actually love the soup from LaMadeleine also but at nearly $13.00 for three 15 oz. jars, making your own can be a lot cheaper too. Plus, you can choose to use organic canned tomatoes or even tomatoes from your garden you’ve canned yourself.

Give this homemade tomato basil soup recipe a try and let me know what you think!

Easy Homemade Tomato Basil Parmesan Soup
 
Ingredients
  • 3 cloves of garlic, minced
  • 2 tablespoons olive oil
  • 2 - 14 oz. cans crushed tomatoes, undrained
  • 1 - 14 oz. can petite diced tomatoes, undrained
  • 2 cups chicken or vegetable broth
  • 1 tsp salt
  • 1 tsp sugar
  • ½ tsp fresh ground black pepper
  • ½ cup milk (2% will give you a creamier soup but even a skim is ok!)
  • 1 teaspoon dried basil
  • ¼ cup grated parmesan cheese
Instructions
  1. In large saucepan, saute garlic in olive oil on medium heat one about minute, until golden but being careful not to burn the garlic. Add the crushed tomatoes and diced tomatoes. Add broth, salt, pepper and sugar. Bring soup to a boil then simmer on medium for 10 minutes.
  2. Turn heat to low and stir in milk, basil and parmesan. Top with shredded parmesan if desired.


Homemade tomato basil soup with Parmesan cheese

The post Easy Homemade Tomato Basil Parmesan Soup appeared first on Meal Planning Magic.

Orange Peach Jack-O-Lantern Halloween Smoothie

$
0
0

This Halloween smoothie is a fun fruit smoothie, made with fresh oranges, peaches, and a boost of protein from vanilla yogurt.

Orange Peach Halloween Smoothie

Halloween is one of our all-time favorite holidays. We love to get into the spirit by decorating the house and yard and helping out at the school’s Haunted House (part of a larger family festival and fundraising evening hosted by our school’s PTO).

I know for many, Halloween can mean lots of candy at trick-or-treating time. Today I’ve got a recipe that will help counter all that sugary sweetness, I’m sharing a more naturally sweet alternative that still has lots of Halloween fun! With a variety of frozen fruits available at the grocery stores year round, it’s easy to whip up an Orange Peach Jack-O-Lantern Smoothie or two anytime. My daughter especially loves this smoothie. I’m not sure if it’s the vanilla or what, but it’s got a slightly frothy feel to it and is bursting with tropical flavor!

Enjoy your orange peach Halloween smoothie with a healthy snack, like cinnamon raisin peanut butter energy bites.

Orange Peach Halloween Smoothie
Author: 
Prep time: 
Total time: 
Serves: 3-4
 
Ingredients
  • 1 cup orange juice
  • 1 cup milk (I used 2%)
  • ½ cup vanilla yogurt
  • 1 teaspoon vanilla
  • 1 tablespoon honey
  • 1 cup frozen peaches, unthawed (I used an orange, peach, strawberry blend but left out the strawberries)
Instructions
  1. Combine all ingredients in blender until smooth. Serve immediately.
  2. For Halloween fun, have kids decorate clear plastic cups with a permanent marker and make fun faces or sayings on the cup. Great for parties—everyone can decorate their own cup!

For Halloween fun, have kids decorate clear plastic cups with a permanent marker and make fun faces or sayings on the cup. Great for parties—everyone can decorate their own cup! My kids got into it and helped decorate some of the cups you see here.

Orange Peach Jack-O-Lantern Halloween Smoothies - healthy smoothies that are festive and fun for Halloween.
This Halloween smoothie is delicious any time of the year, but it is also a great way to have fun and eat well at the same time.

I hope you enjoy it!

This the fruit blend I like to use in this smoothie. I got it a Costco!

This the fruit blend I like to use in this smoothie. I got it a Costco!

Fun Orange Peach Halloween Smoothie - Simple and Delicious!| Recipe on MealPlanningMagic.com
What are your favorite ways to stay healthy during Halloween season?

If you’re looking for something just as easy but a little more indulgent, check out my recipe for Easy Chocolate Black Cat Cookies!

The post Orange Peach Jack-O-Lantern Halloween Smoothie appeared first on Meal Planning Magic.

Cranberry Apple Crisp Plus FREE Festive Flavors Recipe E-Book

$
0
0

Cranberry apple crisp is an easy dessert recipe, using fresh fall produce! Lightly sweetened apples and tart cranberries, covered with crumbly topping, baked until hot and bubbly.

Yesterday I let y’all know about the Produce For Kids’ new E-book, Festive Flavors. I’m excited to let you all know about it because it includes 12 great recipes to help make your holidays a little healthier without sacrificing flavor! There are also tips on how having a plan can help you get through the holidays and how to use up those leftovers too!

Today I’m sharing one of the recipes from the e-book too: Cranberry Apple Crisp. You guys, it is SO yummy! But before I get to the recipe, I want to share more info. about the e-book and some other things I’m working with Produce For Kids on this holiday season.

Festive Flavors Collage

FREE E-Book and Sweepstakes Opportunity!
First off, go download your own FREE copy of the eBook by clicking here. In addition to this great FREE guide, Produce for Kids will be hosting two opportunities for consumers to enter and win this holiday season. Just visit the Produce for Kids Facebook page from Nov. 10 to Dec. 31 to enter to the #FestiveFlavors Sweepstakes for a chance to win a Ninja® 3-in-1 Cooking System. You can also show off your healthy holiday meals on Instagram using the hashtag #FestiveFlavors to be entered to win a Ninja® 3-in-1 Cooking System and have their recipe featured on Produce For Kids.

Festive Flavors Twitter Party!
To compliment the launch, Produce for Kids is hosting a #FestiveFlavors Twitter party on Nov. 12 at 9pm ET with special guests Melissa’s Produce, Naturipe® and Stemilt®. Participating brands will be sharing healthy recipes and tips for the holiday season and consumers will have the opportunity to win grocery store gift cards. I’m planning to be there and I ALWAYS learn something new at a Twitter chat so hope you can make it!

Cranberry apple crisp is an easy dessert recipe, using fresh fall produce! Lightly sweetened apples and tart cranberries, covered with crumbly topping, baked until hot and bubbly.

Cranberry Apple Crisp Recipe

While all the recipes look so tasty, I wanted to try the Cranberry Apple Crisp. Let me tell you, this crisp not only has terrific flavor, it is SUPER easy to put together. I tested it on a weeknight and it was so quick and easy. I love that it is filled with delicious goodness like cranberries, apples, oatmeal and pecans. The pecans give it a great nutty crunch and flavor–something that traditional crisps don’t have.

While this is meant to be a dessert, I’m pretty sure it would be a fine breakfast don’t you think? I mean, it’s got fruit, whole grains and nuts. Add some yogurt and wouldn’t that be a yummy morning treat?

Here’s the cranberry apple recipe. Enjoy!

Cranberry Apple Crisp Plus FREE Festive Flavors E-Book and Fun!
Author: 
 
Ingredients
  • Cranberry Apple Crisp
  • 2 cups fresh cranberries
  • 3 cups Gala or Fuji apples, chopped
  • 1 cup light brown sugar, divided
  • ½ cup (plus 2 Tbsp.) whole wheat flour, divided
  • 1 cup old fashioned oats
  • 1¼ cup pecans, chopped
  • 6 Tbsp. unsalted butter, melted
  • 2 tsp. cinnamon
  • 1 tsp. pure vanilla extract
  • ½ tsp. salt
Instructions
  1. Preheat oven to 350°F.
  2. Combine cranberries, apples, ½ cup sugar and 2 Tbsp. flour in bowl. Pour into greased 8x8-inch baking dish.
  3. Combine oats, pecans, ½ cup sugar, ½ cup flour, butter, cinnamon, vanilla and salt in mixing bowl until all ingredients are blended. Sprinkle over fruit.
  4. Bake 30-40 minutes, or until topping is lightly browned, mixture is bubbly and apples in middle are tender.

I hope you’ll take advantage of all these great ideas and opportunities from Produce For Kids. What are some of your favorite ways to keep the holidays healthy?

Disclaimer: I am a Parents on Produce board member and have been compensated for this post but all opinions are enthusiastically my own.

The post Cranberry Apple Crisp Plus FREE Festive Flavors Recipe E-Book appeared first on Meal Planning Magic.


Peppermint Mousse Mini Brownie Cups

$
0
0

Peppermint Mousse Mini Brownie Cups are a great addition to any holiday dessert table. They’re easy to make, but fancy enough to serve at your holiday parties!

Peppermint Mousse Mini Brownie Cups | 12 Weeks Christmas Treats | Recipe at MealPlanningMagic.com

I’m beginning to realize I have a thing for peppermint sweet treats. I mean, first I had the Peppermint Treats Roundup then these Minty Surprise Cookies and THEN these Chocolate Mint Snowtop Cookies. This week for the 12 Weeks of Christmas Treats, I’m bringing you a super simple pepper-minty treat. You won’t believe how easy yet elegant these Peppermint Mousse Mini Brownie Cup treats are!

I was inspired to create these peppermint mousse treats from a magazine recipe I saw long ago.

I don’t even have the clipping any more but I do remember them. At first, I tried using chocolate graham crackers to make mini graham cracker crust shells but had some trouble with getting them out of the mini-muffin pan without them crumbling to bits. So I thought about brownies and figured out how to make them into little cups to hold my mousse. It’s so easy, you’ll wonder why you didn’t think of it yourself! What you do it make up a batch of your favorite brownie batter (I used a homemade recipe but you could also use a box mix). Bake the brownies in a mini muffin tin and when the brownies are baked and hot out of the oven, use a round tipped spoon or other utensil to push the centers down. Then remove them from the pan to fully cool.
Fill with your mousse mixture and you’re good to go.

Here’s the peppermint mousse brownies recipe for you to make it all:

Peppermint Mousse Mini Brownie Cups
Author: 
 
Ingredients
  • 1 pint heavy whipping cream
  • 8 oz. cream cheese, softened and at room temperature
  • ½ cup granulated sugar
  • 1 - 1 ½ teaspoons peppermint extract
  • Brownie mix.
  • Crushed peppermint candies
Instructions
  1. Prepare brownie mix according to package directions. Divide batter into 24 mini muffin tins. Bake at 350 for 18-20 minutes or until toothpick inserted in middle comes out clean. Using a blunt tipped spoon or other utensil, push down centers of brownies while they are still warm. Remove from pan to cool completely.
  2. Meanwhile, blend cream cheese in a bowl until completely mixed. Slowly add sugar and peppermint extract until fully incorporated. Set aside.
  3. Whip cream with a mixer until soft peaks form. Add cream cheese mixture just until blended. Do not over mix.
  4. Using a piping bag or spoon, add a dollop (about 1 tablespoon) of the mousse to brownie cup. Top each cup with crushed peppermint candies.
  5. Refrigerate until ready to serve.


Miniature Peppermint Mousse Brownie Cups

You can find out all about the 12 Weeks of Christmas Treats by clicking here for more information and details about joining in.
If you’re a blogger, be sure to check the guidelines, join the challenge and then link up your own post each week.

gingerbreadcookies for badge-with text large

The post Peppermint Mousse Mini Brownie Cups appeared first on Meal Planning Magic.

Super Simple Chicken Caesar Salad Wrap

$
0
0

This chicken Caesar salad wrap is a delicious sandwich wrap combining chicken lunch meat with a fresh Caesar salad! Perfect make ahead meal for lunch boxes or an easy dinner.

This Chicken Caesar salad wrap is a delicious sandwich wrap combining chicken lunch meat with a fresh Caesar salad! Perfect make ahead meal for lunch boxes! This post originally appeared here more than five years ago! I’ve updated the photos and the post just a bit to share it with you again. It’s such a simple lunchbox idea that I hope you like it as much as we do!

This is the third and final week for The Mom 100 Cookbook series for Sunday Supper. I have gotten a ton of great new ideas and I hope you have too. In June, I made the Turkey Meat Sauce Lasagna from Katie Workman’s cookbook. It has become a new favorite for our family! And last month I featured my twist on quesadillas with the Pizza Quesadillas. These are fast becoming a staple in our house it seems.

This week we’re talking about back-to-school recipes! Why does it seem that the summer always flies by? I can’t believe my own kids have only a couple of more weeks left until school starts. And every year seems to be a little bit different, with a new routine to get used to.

I know I sure can use all the help I can get, with new recipe ideas that are quick, easy and most importantly, delicious! This week, I did a variation on the wraps section of Workman’s book. We love Caesar salads topped with chicken so when I discovered a similar chicken Caesar salad wrap at our local grocery store I had to try it! It was delicious and I thought to myself, this would be so easy to make for lunch for our own lunchboxes.

This Chicken Caesar salad wrap is a delicious sandwich wrap combining chicken lunch meat with a fresh Caesar salad! Perfect make ahead meal for lunch boxes!

My daughter especially loves this chicken Caesar salad wrap! The store-bought variety has a bit more lunch meat than we like, so that’s what is great about making our own…we can totally customize it. And that’s the tip that Workman gives…customize a wrap to make it your own!

The chicken Caesar salad wrap is pretty simple to put together and best of all, you can make them the night before!

Store in the refrigerator to put into a lunch tote before heading to school or work.

I also grate my own Parmesan cheese for these easy chicken wraps–you can find out how by checking out my post here. Yum!

Chicken Caesar Salad Wrap Recipe #SundaySupper
Prep time: 
Total time: 
Serves: 1 wrap
 
Ingredients
  • 1 medium size whole wheat tortilla
  • 3 slices of chicken lunchmeat (we like the Boar's Head rotisserie chicken)
  • 1 large leaf of green lettuce, washed
  • 1-2 tablespoon grated or shredded parmesan cheese
  • 1-2 tablespoons prepared Caesar salad (commercially prepared or make your own)
Instructions
  1. Spread dressing on entire tortilla. Sprinkle with paremesan cheese. Layer lettuce on tortilla and top with chicken slices on two-thirds of tortilla. Roll up one side then roll all ingredients up and secure with a toothpick if necessary. Enjoy!
Nutrition Information
Serving size: 1 wrap
Ingredients to make a chicken Caesar salad wrap

Just a few simple ingredients is all it takes to whip up this tasty chicken wrap!

making a chicken wrap sandwich

Spread the dressing on the tortilla first–then sprinkle on the cheese.

Chicken Caesar Salad Wrap

Layer everything on the tortilla–I kind of shift it to one side a bit (which this picture doesn’t really show but I do do it).

If you’re looking for some ideas to help you get family-friendly meals on the table this year, then be sure to check out The Mom 100 Cookbook. You can read my review of it here–it really is a great resource for tons of great recipes. Or check out the author’s blog for even more tips and recipes to get you started.

Lastly, be sure to join us this Sunday for #SundaySupper Around the Family Table with Katie Workman at 7pm ET. Katie is so much fun and will be sharing her Easy Back to School Recipes during our chat. And many thanks to Isabel at Family Foodie for starting the #SundaySupper movement and getting us all talking and sharing. We’d love for you to join us and share your tips and inspiration. Let’s make this the best school year yet for our kids!

In addition to the chicken Caesar salad wrap recipe, here are easy back-to-school recipes from the rest of the Sunday Supper members.

Easy Breakfast ideas:

Lunchbox Wraps:
Easy Weekday Suppers:
After School Snacks:

We will be sharing great family recipes all day and want you to share yours with us! Join us at 7pm ET for our #SundaySupper Chat with Katie Workman. Follow us on twitter by using hashtag #Sundaysupper or using Tweetchat. We love to feature your recipes on our #sundaysupper pinterest board and share them with all our followers.

The Mom 100 Cookbook

Disclosure: I have received a copy of The Mom 100 Cookbook and am an Amazon Affiliate (if you order a book from my site, I get a very, very small percentage). All opinions are my own!

This Chicken Caesar salad wrap is a delicious sandwich wrap combining chicken lunch meat with a fresh Caesar salad! Perfect make ahead meal for lunch boxes!

The post Super Simple Chicken Caesar Salad Wrap appeared first on Meal Planning Magic.

Super Simple Chocolate Black Cat Cookies

$
0
0

Chocolate black cat cookies are a fun and easy homemade cookies recipe, perfect for celebrating Halloween. Get your kids into the kitchen to bake these chocolate cookies with you!

This easy Halloween cookies recipe for Chocolate Black Cat Cookies is fun for kids to help with and a fun way to celebrate Halloween. Recipe at MealPlanningMagic. com

I originally shared this recipe here over 5 years ago and it’s just so simple and good I wanted to share it again with those of you that may not have seen it the first time around. I just made these again last week for a teacher appreciation luncheon and they were a hit! A photo of them even made the PTO’s Facebook page–ha! (they didn’t know who had made them–they were just in a collage of photos from the day).

Baking Chocolate Black Cat Cookies has been a tradition in our house every year since I can remember! I shared the black cat cookies recipe originally back in 2011 but I’ve updated the photos again.

They are a quick and easy Halloween treat that are fun for kids of all ages to help with, too. The original recipe is from a newspaper clipping my mom cut out many, many years ago and they were something we made when I was younger. And I’ve been making them ever since! A few years ago, I even won third place in a regional magazine’s recipe contest years ago! How fun is that?

This easy Halloween cookies recipe for Chocolate Black Cat Cookies is fun for kids to help with and a fun way to celebrate Halloween. Recipe at MealPlanningMagic. com

Now I make them with my own children and they are old enough to practically make them themselves–as a matter of fact, this year they did. They are by no means healthy, but a fun little treat for the holidays and they are SOOO easy!

Easy Black Cat Cookies for Halloween | #halloween | from MealPlanningMagic.com
Simple Chocolate Black Cat Cookies | #halloween | from MealPlanningMagic.com

I hope you and your kids love baking these chocolate black cat cookies.

Easy Chocolate Black Cat Cookies

Yields 3 dozen cookies     adjust servings
These Super Simple Chocolate Black Cat Face Cookies are fun for kids to make and perfect for your Halloween celebrations. Get the recipe at MealPlanningMagic. com

Ingredients

  • 1 box cake mix, chocolate or devil's food flavor
  • 1 cup creamy peanut butter (you could also substitute another nut butter or sun butter)
  • 2 large eggs
  • 1/4 cup water
  • 1/2 cup granulated sugar
  • 3/4 cup chocolate chips (for eyes)
  • 1 jar red hot candies or red mini-chocolate candies such as M&Ms (for nose)--we prefer the M&Ms as they're easier to eat, especially for younger children

Instructions

  1. Mix together peanut butter, cake mix, eggs and ¼ cup water. Add more water as needed if dough is too stiff. Roll dough into 1 ½” balls. Roll ball in sugar and place on cookie sheet. Then press ball flat with bottom of a glass. Form into cat faces by pinching two ears at the top of cookie. Use a fork to form the whiskers on either side of face. Add chocolate chips for the eyes and one red hot or red chocolate candy for the nose. Bake 7-8 minutes at 325º. Makes about 55 cookies

by

Nutrition Facts
Serving Size 1
Amount Per Serving As Served
Calories 1518kcal Calories from fat 850
% Daily Value
Total Fat 94g 145%
Saturated Fat 38g 190%
Transfat 0g
Cholesterol 132mg 44%
Sodium 114mg 5%
Carbohydrate 164g 55%
Dietary Fiber 13g 52%
Sugars 139g
Protein 31g

Percent Daily Values are based on a 2,000 calorie diet. Your daily values may be higher or lower depending on your calorie needs:

Calories 2000
Total Fat Less than 65g
Sat Fat Less than 25g
Cholesterol Less than 300mg
Sodium Less than 2,400mg
Total Carbohydrate 300g
Dietary Fiber 25g

This easy Halloween cookies recipe for Chocolate Black Cat Cookies is fun for kids to help with and a fun way to celebrate Halloween. Recipe at MealPlanningMagic. com
If you’re still looking for some Halloween week treats, be sure to check out my Halloween Pinterest board. Happy early Halloween and I hope you take some time to have a little fun in the kitchen with your family!

Don’t want to miss an update? Be sure to SIGN UP HERE to receive updates via email or RSS feed (you can choose the reader you prefer!) And don’t forget you can always follow me on Facebook, Twitter, Pinterest or Instagram. They all offer a little something different and are a great way to stay in the loop on new menu plans, recipe ideas, giveaways, organizing tips and more!


This easy Halloween cookies recipe for Chocolate Black Cat Cookies is fun for kids to help with and a fun way to celebrate Halloween. Recipe at MealPlanningMagic. com

The post Super Simple Chocolate Black Cat Cookies appeared first on Meal Planning Magic.

All-Natural Pumpkin Spice Hot Cocoa

$
0
0

Capture the taste of fall with pumpkin and chocolate in this simple and delicious Pumpkin Spice Hot Cocoa recipe. Makes enough to share--if you're willing to!

Pumpkin spice hot cocoa is a delicious and easy fall drink recipe. Rich cocoa combined with smooth pumpkin flavor makes this a family friendly warm beverage recipe.

I first shared this Pumpkin Spice Latte Cocoa recipe over four years ago. I can’t believe the time that has flown by since then, so I thought it was worth sharing this delicious recipe again.
Are you Team PSL or not? That is Team Pumpkin Spice Latte in case you’re wondering. I’m a lover of all things pumpkin as evidenced by my Pumpkinpalooza board on Pinterest.
https://www.pinterest.com/mealplanmom/pumpkin-palooza/

If you’re not caught up in the pumpkin flavored frenzy of this season then just move along. But, if you’re like me and love pumpkin flavored foods, then keep reading.
When I first developed this recipe, I was craving a pumpkin spice latte but wasn’t really in the mood for the coffee part. But I did want a warm beverage that put me in the fall mood. So, I thought to myself, I’ve seen pumpkin bread and muffins with chocolate chips, why not give pumpkin hot cocoa a try? I’m so glad I did because the flavor blend was just what I was looking for! And so super easy to make, too.

Capture the taste of fall with pumpkin and chocolate in this simple and delicious Pumpkin Spice Hot Cocoa recipe. Makes enough to share--if you're willing to!

A few simple ingredients is all it takes to make this Pumpkin Spice Hot Cocoa.

I experimented a bit and came up with this recipe. I wanted to keep the ingredients all natural so I even use real pumpkin (canned, but you can use fresh, cooked pumpkin if you like). I also created my own hot cocoa mix but you could always use the packaged kind if you like. You can find pumpkin spice blend in the spice aisle of your grocery store. What I came up with was perfect and had just the pumpkin to chocolate ratio I was looking for.

Capture the taste of fall with pumpkin and chocolate in this simple and delicious Pumpkin Spice Hot Cocoa recipe. Makes enough to share--if you're willing to!

The recipe here makes enough to share but if you’re the only one who will be enjoying it, save your leftovers in the refrigerator to warm up the next day. You can keep the mixture in the refrigerator for up to five days (if it lasts that long). Just be sure to shake or stir it to blend the ingredients again because as it cools, the ingredients tend to separate a bit. I found that putting the mixture in a sealed mason jar worked great because I could just shake away and see when everything is blended again.

This recipe only uses a partial can of pumpkin puree so what to do with the leftovers you ask? I like to freeze it by 1/4 cup amounts in silicone muffin cups. When they are frozen, I can pop them out and store in a zip top bag. Then when I’m ready to use, all I need to do is thaw just the amount I need and I’m good to go. A quarter cup is a nice amount as it’s not too much if you don’t need a lot but you can also pull out more than one if you need more.

Capture the taste of fall with pumpkin and chocolate in this simple and delicious Pumpkin Spice Hot Cocoa recipe.

I hope you’ll give this recipe for Pumpkin Spice Hot Cocoa a try!

Don’t want to miss a recipe? Then be sure to CLICK HERE so you can subscribe to all the updates. Besides sharing recipes like this one, I also share all kinds of meal planning and kitchen organization ideas. It’s simple and you’ll also receive weekly meal planning inspiration in your inbox!

Pumpkin Hot Cocoa

Capture the taste of fall with pumpkin and chocolate in this simple and delicious Pumpkin Spice Hot Cocoa recipe. Makes enough to share--if you're willing to!

Ingredients

  • 2 1/2 cups milk
  • 1/2 cup canned pumpkin
  • 1/3 cup cocoa mix (or make your own--see recipe below)
  • 1 1/2 tsp. pumpkin pie spice (don't have any? You can make your own--Here's one to try
  • 1/2 tsp vanilla
  • Dash of salt
  • Whipped cream (optional)
  • Homemade Hot Cocoa Mix
  • 3/4 cup sugar
  • 1/2 cup baking cocoa
  • 1/2 tsp. salt

Instructions

In a medium saucepan or microwave safe bowl, warm milk until heated through to desired temperature (about 2-3 minutes in microwave, 5 minutes on low in saucepan).
With a whisk, blend remaining ingredients until combined.
Serve warm. Top with whipped cream if desired.
Store any leftovers in an airtight container in the refrigerator for up to five days.

For Homemade Hot Cocoa Mix
Blend all ingredients together. Store in an airtight container. To use, blend two heaping tablespoons with one cup warm milk.

by

Nutrition Facts
Serving Size
Amount Per Serving As Served
Calories 1144kcal Calories from fat 241
% Daily Value
Total Fat 27g 42%
Saturated Fat 15g 75%
Cholesterol 61mg 20%
Sodium 1645mg 69%
Carbohydrate 224g 75%
Dietary Fiber 20g 80%
Sugars 192g
Protein 30g

Percent Daily Values are based on a 2,000 calorie diet. Your daily values may be higher or lower depending on your calorie needs:

Calories 2000
Total Fat Less than 65g
Sat Fat Less than 25g
Cholesterol Less than 300mg
Sodium Less than 2,400mg
Total Carbohydrate 300g
Dietary Fiber 25g


Capture the taste of fall with pumpkin and chocolate in this simple and delicious Pumpkin Spice Hot Cocoa recipe. Makes enough to share--if you're willing to!

Don’t want to miss a recipe? Then be sure to CLICK HERE so you can subscribe to all the updates. Besides sharing recipes like this one, I also share all kinds of meal planning and kitchen organization ideas. It’s simple and you’ll also receive weekly meal planning inspiration in you inbox!

Capture the taste of fall with pumpkin and chocolate in this simple and delicious Pumpkin Spice Hot Cocoa recipe. Makes enough to share--if you're willing to!

The post All-Natural Pumpkin Spice Hot Cocoa appeared first on Meal Planning Magic.

No Bake Chocolate Cherry Snack Bites

$
0
0

No Bake Chocolate Cherry Snack Bites are easy no bake cookies, made using just a few simple ingredients, including dried bing cherries, chocolate, and rolled oats!

Over five and half years ago I did a review for Naturebox snacks, a snack subscription service. They were just starting out and the idea of receiving wholesome, healthy snacks once a month sounded like a neat idea, especially for someone who doesn’t have a large selection of healthy food stores near them. It would even make a great gift!

I thought it was time I shared this No Bake Chocolate Cherry Snack Bites recipe with you all again. They have several recipes on their website using some of the snacks in their boxes and that’s when I first tried dried cherries. Now we buy our dried cherries at Costco and they’re one of my husband’s favorites to snack on alone or mix in with granola.

The combination of cherry and chocolate has always been one of my favorites like these Cherry Chocolate Cutout Sugar Cookies, Chocolate Covered Cherry Delight Cookies, Black Forest Brownies or Cherry Chocolate Kiss Cookies. There are lots to choose from!

I love that these No Bake Chocolate Cherry Snack Bites are full of all-natural ingredients like whole grain oats, banana, cocoa powder and peanut butter, plus dried cherries of course. Somehow these flavors all just seem to work really well together! I have modified the original recipe slightly to reduce the sugar slightly and a couple of other small changes to make them a bit more healthy.

You’ll want to store these in the refrigerator so they stay fresh. You can store them up to a week in the refrigerator (if they last that long!) They are so easy to make and freeze well too so you can make a big batch to have on hand any time!

Chocolate Cherry No-Bake Cookies

Prep Time 15 min Yields 24 dozen     adjust servings

These little bites of chocolate, oats, cherries and bananas are just enough to satisfy that sweet tooth--a little more naturally!

Ingredients

  • 3 cups old fashion oats
  • 1 tsp vanilla
  • 1/2 cup dried cherries, finely chopped
  • 1 very ripe banana, mashed
  • 1/3 cup sugar
  • 1/2 cup milk of choice
  • 1/2 cup peanut butter
  • 1/4 cup cocoa powder

Instructions

in a medium saucepan, combine sugar, milk, peanut butter and cocoa.
Continue to stir over medium heat until it comes to a slow boil.
Allow the mixture to boil for about one minute and then remove from heat.
Let the mixture cool for a minute or two, then add in the oats, banana, vanilla, and cherries and stir to combine.
Using a mini cookie dough scoop, drop scoops onto a cookie sheet covered in waxed paper or with a silicon baking mat.
Cool to room temperature or refrigerate.
Store in refrigerator for up to one week or in freezer for up to 3 months.

by

Recipe Notes

If you are using just the scoop, your bites will come out a bit more blob like. That is ok!
But if you want them to look more roundish, use a scoop then roll with your hands and place on lined baking sheet to cool before storing.

Nutrition Facts
Serving Size 2
Amount Per Serving As Served
Calories 140kcal Calories from fat 40
% Daily Value
Total Fat 4g 6%
Saturated Fat 1g 5%
Transfat 0g
Cholesterol 1mg 0%
Sodium 4mg 0%
Carbohydrate 21g 7%
Dietary Fiber 3g 12%
Sugars 6g
Protein 5g

Percent Daily Values are based on a 2,000 calorie diet. Your daily values may be higher or lower depending on your calorie needs:

Calories 2000
Total Fat Less than 65g
Sat Fat Less than 25g
Cholesterol Less than 300mg
Sodium Less than 2,400mg
Total Carbohydrate 300g
Dietary Fiber 25g

For more snack bites like these No Bake Chocolate Cherry Snack Bites, be sure to check out my Cinnamon Raisin Peanut Butter Energy Bites or Peanut Butter Chocolate Energy Bites!

Have a question or want to share recipe ideas with others? Then join my private Facebook group, Meal Planning Magic Community Table here.

And don’t forget you can always follow me on Facebook, Twitter, Pinterest , Instagram or Google+. They all offer a little something different and are a great way to stay in the loop on new menu plans, recipe ideas, giveaways, organizing tips and more!

The post No Bake Chocolate Cherry Snack Bites appeared first on Meal Planning Magic.

Easy Copycat BLT Chicken Salad Sandwich

$
0
0

BLT chicken salad sandwiches are a delicious combination of a classic chicken salad sandwich and a bacon, lettuce, and tomato sandwich. This easy sandwich recipe is perfect for lunchboxes!

This BLT Chicken Salad Sandwich is a delicious combination of a classic chicken salad sandwich and a bacon, lettuce, and tomato sandwich. This easy sandwich recipe is perfect anytime!

A Classic Sandwich Combination: BLT Chicken Salad Sandwich

Several years ago when Starbucks expanded their menu to include breakfast and lunch options I was all over it. Truth be told, I don’t really go to Starbucks all that often but when I do, I like to try their new savory menu items. They all look so good (and many have tasted as good as they looked).

So those several years ago, one menu item that caught my eye was the BLT Chicken Salad Sandwich. If you’ve followed me for awhile you may have noticed I love this classic combo. I’ve shared other recipes like BLT Soup and One Pot BLT Pasta and BLT Egg Salad Sandwich.

BLT chicken salad sandwiches are a delicious combination of a classic chicken salad sandwich and a bacon, lettuce, and tomato sandwich. This easy sandwich recipe is perfect for lunchboxes!

Bacon, lettuce and tomato has long been one of my favorite sandwiches and mixing it with a chicken salad? Now that’s genius! When I originally posted this recipe in 2013, I searched online for a similar recipe but when I couldn’t find one, I decided to create my own.

It was really quite simple to prepare and it was a HUGE hit with my family. My son especially like the classic BLT combo. This BLT Chicken Salad recipe is definitely a keeper! I love that it also has a variety of healthy ingredients like tomatoes and lettuce. I like to use a lean bacon too. You can use a whole wheat bread but if you want to splurge a little bit go for a thick slice of crusty French bread.

BLT chicken salad sandwiches are a delicious combination of a classic chicken salad sandwich and a bacon, lettuce, and tomato sandwich. This easy sandwich recipe is perfect for lunchboxes!

Since originally posting this recipe, I’ve discovered a delicious BLT at of all places a Texas based chain convenience store called Buc-ees. (If you’re a Texan, you no doubt may already know about them—some of the cleanest bathrooms in the country!) They use Texas toast, thick cut pepper bacon, lettuce, tomato and a creamy mayonnaise.

I think the next time I make this BLT Chicken Salad Sandwich I may mix things up and add some pepper bacon and Texas toast to kick up the flavor! No matter how you make it, I hope you’ll love this sandwich as much as we do!

BLT Chicken Salad Sandwich

  • 2 cups shredded or cubed cooked chicken (I used leftover rotisserie chicken)
  • 6-8 strips of cooked bacon (diced)
  • 1 large tomato (diced)
  • 1/2 cup mayonnaise
  • Salt & Pepper to taste
  • 8 Romaine lettuce leaves
  • 8 slices whole wheat sandwich bread
  1. Combine chicken, bacon, tomato, mayonnaise, salt and pepper. Mix well and chill in refrigerator for about 30 minutes or longer to let flavors blend.
  2. Toast bread if desired.
  3. For each sandwich, layer lettuce and about 1/2 cup of chicken salad mixture. Top with another lettuce leaf and slice of bread.
  4. Enjoy!

BLT chicken salad sandwiches are a delicious combination of a classic chicken salad sandwich and a bacon, lettuce, and tomato sandwich. This easy sandwich recipe is perfect for lunchboxes!

More Sandwich Recipes
If you like a good, simple sandwich or wrap, be sure to check out these other recipes here on my blog:
Bistro Style Steak and Onion Sandwich
Simple Caprese Panini (with Tomato, Basil and Fresh Mozzarella)
Simple Sauteed Vegetable Panini
Turkey Apple Honey Pecan Wrap
Super Simple Chicken Caesar Salad Wrap

Have a question or want to share recipe ideas with others? Then join my private Facebook group, Meal Planning Magic Community Table here.

And don’t forget you can always follow me on Facebook, Twitter, Pinterest , Instagram or Google+. And don’t forget to sign up for my email list here so you never miss a new post! Each of these ways to connect all offer a little something different and are a great way to stay in the loop on new menu plans, recipe ideas, giveaways, organizing tips and more! Want to know what items I’m using in my own kitchen to help streamline my time there? Then check out my Amazon Shop at https://www.amazon.com/shop/mealplanmom (see disclaimer in footer below this post)

The post Easy Copycat BLT Chicken Salad Sandwich appeared first on Meal Planning Magic.

Simple Cinnamon Honey Roasted Garbanzo Beans

$
0
0

Simple Cinnamon Honey Roasted Garbanzo Beans are a delicious and nutritious snack idea perfect anytime.

Simple Cinnamon Honey Roasted Garbanzo Beans are a delicious and nutritious snack idea perfect for anytime.

Several years ago blogger challenges were all the thing and I used to host one myself called the Eating the Alphabet Challenge. It’s then that I first shared my recipe for Cinnamon Honey Roasted Garbanzo Beans. The challenge featured fruits, vegetables or beans each month we’d share a recipe that started with a different letter each month. I no longer host the challenge but many of the recipes I shared back then are worth resharing. So I’ve updated the photos and text here to reshare this recipe for you all–it may be totally new to many of you!

At the time, over five years ago, I hadn’t really heard of roasting garbanzo beans until my sister-in-law told me how much her kids love roasted garlic garbanzo beans. I decided to give a sweet spin on the snack and created this recipe for Cinnamon Honey Roasted Garbanzo Beans. Now you’ve probably seen many other recipes for roasted garbanzo beans but this is still one of my favorites!

Simple Cinnamon Honey Roasted Garbanzo Beans are a delicious and nutritious snack idea perfect for anytime.

This snack is SO simple to make and for those that are nut-free, a great alternative to the crunchiness that snacking on nuts can provide. For me, it took a little practice to get it just right on the crunchiness without them getting too hard. When you’re done, just store them in an airtight container until you’re ready for snacking. This snack makes a great addition to lunch boxes, after-school snacks or for healthy eating on the road.

Simple Cinnamon Honey Roasted Garbanzo Beans are a delicious and nutritious snack idea perfect for anytime.

A Delicious, Nutrition Packed Snack

We love using garbanzo beans to make homemade hummus but this is a tasty new way to try them. Garbanzo beans, also known as chickpeas, are packed with nutrition making these an even better snack to me! They are a great source of dietary protein and are rich in dietary fiber. One cup of garbanzo beans supplies almost half of the recommended daily allowance of dietary fiber! They’re full of vitamins and minerals too like manganese, folate and iron.

I hope you enjoy these Cinnamon Honey Roasted Garbanzo Beans as much as we do!
Simple Cinnamon Honey Roasted Garbanzo Beans are a delicious and nutritious snack idea perfect for anytime.

Roasted Cinnamon Honey Garbanzo Beans

  • 1 15 oz. can garbanzo beans (also called chickpeas)
  • 1 teaspoon ground cinnamon
  • 1 tablespoon granulated sugar
  • 2 teaspoons vegetable, canola or coconut oil (your choice)
  • 1 tablespoon honey
  1. Preheat oven to 375 degrees F.
  2. Drain and rinse garbanzo beans. Place beans on a towel to dry. You may pat them to dry. Let them air-dry about 15 minutes for extra crunchiness.
  3. In a small bowl, add cinnamon and sugar. Whisk together to combine then add oil and mix until blended. It will clump a bit but that’s ok. Add garbanzo beans and stir until beans are evenly coated. Spread out garbanzo beans on a large baking sheet. Bake for about 35-40 minutes, stirring every 10-15 minutes, until chickpeas are crunchy and no longer soft in the middle.
  4. Return hot, roasted chickpeas in a small bowl and coat evenly with honey. Spread garbanzo beans back out on baking sheet and allow to dry. Store in an airtight container at room temperature.

Simple Cinnamon Honey Roasted Garbanzo Beans are a delicious and nutritious snack idea perfect for anytime.

Looking for more healthy snack ideas? Be sure to check out these recipes too:
No Bake Chocolate Cherry Snack Bites
Super Simple Black Forest Trail Mix
Cinnamon Raisin Peanut Butter Energy Bites
Family Friendly Homemade Granola Bars
65+ Better For You Road Trip Snacks Recipe Roundup


Have a question or want to share recipe ideas with others? Then join my private Facebook group, Meal Planning Magic Community Table here.

And don’t forget you can always follow me on Facebook, Twitter, Pinterest , Instagram or Google+. And don’t forget to sign up for my email list here so you never miss a new post! Each of these ways to connect all offer a little something different and are a great way to stay in the loop on new menu plans, recipe ideas, giveaways, organizing tips and more! Want to know what items I’m using in my own kitchen to help streamline my time there? Then check out my Amazon Shop at https://www.amazon.com/shop/mealplanmom

Simple Cinnamon Honey Roasted Garbanzo Beans are a delicious and nutritious snack idea perfect for anytime.

The post Simple Cinnamon Honey Roasted Garbanzo Beans appeared first on Meal Planning Magic.


Orange Peach Jack-O-Lantern Halloween Smoothie

$
0
0

This Halloween smoothie is a fun fruit smoothie, made with fresh oranges, peaches, and a boost of protein from vanilla yogurt.

Orange Peach Halloween Smoothie

Halloween is one of our all-time favorite holidays. We love to get into the spirit by decorating the house and yard and helping out at the school’s Haunted House (part of a larger family festival and fundraising evening hosted by our school’s PTO).

I know for many, Halloween can mean lots of candy at trick-or-treating time. Today I’ve got a recipe that will help counter all that sugary sweetness, I’m sharing a more naturally sweet alternative that still has lots of Halloween fun! With a variety of frozen fruits available at the grocery stores year round, it’s easy to whip up an Orange Peach Jack-O-Lantern Smoothie or two anytime. My daughter especially loves this smoothie. I’m not sure if it’s the vanilla or what, but it’s got a slightly frothy feel to it and is bursting with tropical flavor!

Enjoy your orange peach Halloween smoothie with a healthy snack, like cinnamon raisin peanut butter energy bites.


Orange Peach Halloween Smoothie
Author: Meal Planning Magic
Prep time:
Total time:
Serves: 3-4
Ingredients
  • 1 cup orange juice
  • 1 cup milk (I used 2%)
  • ½ cup vanilla yogurt
  • 1 teaspoon vanilla
  • 1 tablespoon honey
  • 1 cup frozen peaches, unthawed (I used an orange, peach, strawberry blend but left out the strawberries)
Instructions
  1. Combine all ingredients in blender until smooth. Serve immediately.
  2. For Halloween fun, have kids decorate clear plastic cups with a permanent marker and make fun faces or sayings on the cup. Great for parties—everyone can decorate their own cup!

For Halloween fun, have kids decorate clear plastic cups with a permanent marker and make fun faces or sayings on the cup. Great for parties—everyone can decorate their own cup! My kids got into it and helped decorate some of the cups you see here.

Orange Peach Jack-O-Lantern Halloween Smoothies - healthy smoothies that are festive and fun for Halloween.
This Halloween smoothie is delicious any time of the year, but it is also a great way to have fun and eat well at the same time.

I hope you enjoy it!

This the fruit blend I like to use in this smoothie. I got it a Costco!

This the fruit blend I like to use in this smoothie. I got it a Costco!

Fun Orange Peach Halloween Smoothie - Simple and Delicious!| Recipe on MealPlanningMagic.com
What are your favorite ways to stay healthy during Halloween season?

If you’re looking for something just as easy but a little more indulgent, check out my recipe for Easy Chocolate Black Cat Cookies!

The post Orange Peach Jack-O-Lantern Halloween Smoothie appeared first on Meal Planning Magic.

Cranberry Apple Crisp Plus FREE Festive Flavors Recipe E-Book

$
0
0

Cranberry apple crisp is an easy dessert recipe, using fresh fall produce! Lightly sweetened apples and tart cranberries, covered with crumbly topping, baked until hot and bubbly.

Yesterday I let y’all know about the Produce For Kids’ new E-book, Festive Flavors. I’m excited to let you all know about it because it includes 12 great recipes to help make your holidays a little healthier without sacrificing flavor! There are also tips on how having a plan can help you get through the holidays and how to use up those leftovers too!

Today I’m sharing one of the recipes from the e-book too: Cranberry Apple Crisp. You guys, it is SO yummy! But before I get to the recipe, I want to share more info. about the e-book and some other things I’m working with Produce For Kids on this holiday season.

Festive Flavors Collage

FREE E-Book and Sweepstakes Opportunity!
First off, go download your own FREE copy of the eBook by clicking here. In addition to this great FREE guide, Produce for Kids will be hosting two opportunities for consumers to enter and win this holiday season. Just visit the Produce for Kids Facebook page from Nov. 10 to Dec. 31 to enter to the #FestiveFlavors Sweepstakes for a chance to win a Ninja® 3-in-1 Cooking System. You can also show off your healthy holiday meals on Instagram using the hashtag #FestiveFlavors to be entered to win a Ninja® 3-in-1 Cooking System and have their recipe featured on Produce For Kids.

Festive Flavors Twitter Party!
To compliment the launch, Produce for Kids is hosting a #FestiveFlavors Twitter party on Nov. 12 at 9pm ET with special guests Melissa’s Produce, Naturipe® and Stemilt®. Participating brands will be sharing healthy recipes and tips for the holiday season and consumers will have the opportunity to win grocery store gift cards. I’m planning to be there and I ALWAYS learn something new at a Twitter chat so hope you can make it!

Cranberry apple crisp is an easy dessert recipe, using fresh fall produce! Lightly sweetened apples and tart cranberries, covered with crumbly topping, baked until hot and bubbly.

Cranberry Apple Crisp Recipe

While all the recipes look so tasty, I wanted to try the Cranberry Apple Crisp. Let me tell you, this crisp not only has terrific flavor, it is SUPER easy to put together. I tested it on a weeknight and it was so quick and easy. I love that it is filled with delicious goodness like cranberries, apples, oatmeal and pecans. The pecans give it a great nutty crunch and flavor–something that traditional crisps don’t have.

While this is meant to be a dessert, I’m pretty sure it would be a fine breakfast don’t you think? I mean, it’s got fruit, whole grains and nuts. Add some yogurt and wouldn’t that be a yummy morning treat?

Here’s the cranberry apple recipe. Enjoy!

Cranberry Apple Crisp Plus FREE Festive Flavors E-Book and Fun!
Author: Meal Planning Magic
Ingredients
  • Cranberry Apple Crisp
  • 2 cups fresh cranberries
  • 3 cups Gala or Fuji apples, chopped
  • 1 cup light brown sugar, divided
  • ½ cup (plus 2 Tbsp.) whole wheat flour, divided
  • 1 cup old fashioned oats
  • 1¼ cup pecans, chopped
  • 6 Tbsp. unsalted butter, melted
  • 2 tsp. cinnamon
  • 1 tsp. pure vanilla extract
  • ½ tsp. salt
Instructions
  1. Preheat oven to 350°F.
  2. Combine cranberries, apples, ½ cup sugar and 2 Tbsp. flour in bowl. Pour into greased 8×8-inch baking dish.
  3. Combine oats, pecans, ½ cup sugar, ½ cup flour, butter, cinnamon, vanilla and salt in mixing bowl until all ingredients are blended. Sprinkle over fruit.
  4. Bake 30-40 minutes, or until topping is lightly browned, mixture is bubbly and apples in middle are tender.

I hope you’ll take advantage of all these great ideas and opportunities from Produce For Kids. What are some of your favorite ways to keep the holidays healthy?

Disclaimer: I am a Parents on Produce board member and have been compensated for this post but all opinions are enthusiastically my own.

The post Cranberry Apple Crisp Plus FREE Festive Flavors Recipe E-Book appeared first on Meal Planning Magic.

Peppermint Mousse Mini Brownie Cups

$
0
0

Peppermint Mousse Mini Brownie Cups are a great addition to any holiday dessert table. They’re easy to make, but fancy enough to serve at your holiday parties!

Peppermint Mousse Mini Brownie Cups | 12 Weeks Christmas Treats | Recipe at MealPlanningMagic.com

I’m beginning to realize I have a thing for peppermint sweet treats. I mean, first I had the Peppermint Treats Roundup then these Minty Surprise Cookies and THEN these Chocolate Mint Snowtop Cookies. This week for the 12 Weeks of Christmas Treats, I’m bringing you a super simple pepper-minty treat. You won’t believe how easy yet elegant these Peppermint Mousse Mini Brownie Cup treats are!

I was inspired to create these peppermint mousse treats from a magazine recipe I saw long ago.

I don’t even have the clipping any more but I do remember them. At first, I tried using chocolate graham crackers to make mini graham cracker crust shells but had some trouble with getting them out of the mini-muffin pan without them crumbling to bits. So I thought about brownies and figured out how to make them into little cups to hold my mousse. It’s so easy, you’ll wonder why you didn’t think of it yourself! What you do it make up a batch of your favorite brownie batter (I used a homemade recipe but you could also use a box mix). Bake the brownies in a mini muffin tin and when the brownies are baked and hot out of the oven, use a round tipped spoon or other utensil to push the centers down. Then remove them from the pan to fully cool.
Fill with your mousse mixture and you’re good to go.

Here’s the peppermint mousse brownies recipe for you to make it all:

Peppermint Mousse Mini Brownie Cups
Author: Meal Planning Magic
Ingredients
  • 1 pint heavy whipping cream
  • 8 oz. cream cheese, softened and at room temperature
  • ½ cup granulated sugar
  • 1 – 1 ½ teaspoons peppermint extract
  • Brownie mix.
  • Crushed peppermint candies
Instructions
  1. Prepare brownie mix according to package directions. Divide batter into 24 mini muffin tins. Bake at 350 for 18-20 minutes or until toothpick inserted in middle comes out clean. Using a blunt tipped spoon or other utensil, push down centers of brownies while they are still warm. Remove from pan to cool completely.
  2. Meanwhile, blend cream cheese in a bowl until completely mixed. Slowly add sugar and peppermint extract until fully incorporated. Set aside.
  3. Whip cream with a mixer until soft peaks form. Add cream cheese mixture just until blended. Do not over mix.
  4. Using a piping bag or spoon, add a dollop (about 1 tablespoon) of the mousse to brownie cup. Top each cup with crushed peppermint candies.
  5. Refrigerate until ready to serve.


Miniature Peppermint Mousse Brownie Cups

You can find out all about the 12 Weeks of Christmas Treats by clicking here for more information and details about joining in.
If you’re a blogger, be sure to check the guidelines, join the challenge and then link up your own post each week.

gingerbreadcookies for badge-with text large


The post Peppermint Mousse Mini Brownie Cups appeared first on Meal Planning Magic.

Easy Homemade Stovetop Mac and Cheese

$
0
0

Homemade Stovetop Mac and Cheese - freezer friendly too! | Recipe at MealPlanningMagic.com

I’ve been making a lot of macaroni and cheese this summer for lunches it seems. It’s a favorite and this version for Easy Homemade Stovetop Mac and Cheese is so easy and so much better for you than the boxed stuff! I first posted this recipe about two and a half years ago and over those years I’ve tweaked the recipe a bit to make it taste even more delicious and share those changes with you too. And I’ve updated the photos a bit also. Maybe you’re new here and you’re just discovering this recipe for the first time–lucky you!

My kids love macaroni and cheese. Shoot, I do too! I craved that stuff in the little blue box when I was pregnant with my son! But after I started learning what was in those box mixes, I decided I wanted to try and find a recipe that I could make from scratch. It was somewhat challenging to find a recipe that provided the convenience of the box mixes with the same creamy texture and flavor that we liked.

Several of the recipes I first tried included mustard but my family didn’t care for that flavor so I continued my search. Then I came upon a recipe for a basic cheese sauce and knew it would be a great start. I modified it a bit to make it better for pasta (and with more cheesy flavor) and it was a hit! What I also love about this recipe is that in the time it takes to boil the pasta, you can have the sauce made so that you’re ready to eat it when the pasta is cooked. I can generally have it done in about 15 minutes (depending on what type of pasta we choose). Now isn’t that almost just as easy as the boxed stuff? And so much better for you too because it’s made with real food ingredients.

Of course, you know I like to see if things freeze well so I can take it one step further to make meal prep even easier! So I tested this by freezing some of the leftover sauce and when I thawed and reheated it, it was just fine. Yay for extra simplicity. So feel free to make up a big batch of this sauce so you can freeze it into smaller portions for a quick and easy meal, side dish or yummy lunchbox option (put it a Thermos food jar and you’ll be good to go!)

I hope you enjoy this Easy Homemade Stovetop Mac and Cheese too!

Make this Homemade Stovetop Mac and Cheese in 15 minutes or less (for real!). The sauce is freezer friendly too! | Recipe at MealPlanningMagic.com

Easy Homemade Stovetop Mac & Cheese Recipe

  • 3 cups 1% low-fat milk (divided)
  • 1/3 cup all-purpose flour
  • 3/4-1 teaspoons salt
  • 2 cups sharp cheddar cheese (shredded)
  • ¼-½ teaspoon ground black pepper (to taste)
  • 16 oz. whole wheat pasta (gemelli or shells work well, uncooked)
  1. FOR SAUCE:
  2. Combine 1 cup milk and flour, using whisk to blend into a smooth mixture. Stir in remaining 2 cups milk and salt and bring to a boil over medium heat, stirring often to avoid burning or sticking. Turn heat to low and simmer for about 3 minutes, until slightly thickened, stirring constantly. Remove from heat and add shredded cheese and pepper, stirring until cheese is melted. Set aside.
  3. FOR PASTA:
  4. Cook pasta according to package directions. Drain and return to pot.
  5. FOR MAC & CHEESE:
  6. Add cheese sauce over cooked pasta in pan and serve.

Be sure to use SHARP cheddar cheese for the richest cheesy flavor. Other cheddar will work but we like the sharp cheese the best.

TIP! This sauce freezes well! Add to freezer safe containers, then label and freeze. When ready to use, thaw sauce over low heat in pot or in microwave until melted and warm, stirring well to recombine and make smooth. Add cooked pasta for a quick and easy meal or side dish!


Homemade Stovetop Mac and Cheese | Recipe at MealPlanningMagic.com

Be sure to whisk your milk mixture constantly to avoid burning. Remove from heat before adding the cheese and whisk it in–it will blend in easily!

Here’s the original picture in case you’ve found me on Pinterest from my original pin and are wondering if you’re in the right place!
Easy Homemade Stovetop Mac & Cheese Recipe | Meal Planning Magic

The post Easy Homemade Stovetop Mac and Cheese appeared first on Meal Planning Magic.

Super Simple Chicken Caesar Salad Wrap

$
0
0

This chicken Caesar salad wrap is a delicious sandwich wrap combining chicken lunch meat with a fresh Caesar salad! Perfect make ahead meal for lunch boxes or an easy dinner.

This Chicken Caesar salad wrap is a delicious sandwich wrap combining chicken lunch meat with a fresh Caesar salad! Perfect make ahead meal for lunch boxes!

This post originally appeared here more than five years ago! I’ve updated the photos and the post just a bit to share it with you again. It’s such a simple lunchbox idea that I hope you like it as much as we do!

This is the third and final week for The Mom 100 Cookbook series for Sunday Supper. I have gotten a ton of great new ideas and I hope you have too. In June, I made the Turkey Meat Sauce Lasagna from Katie Workman’s cookbook. It has become a new favorite for our family! And last month I featured my twist on quesadillas with the Pizza Quesadillas. These are fast becoming a staple in our house it seems.

This week we’re talking about back-to-school recipes! Why does it seem that the summer always flies by? I can’t believe my own kids have only a couple of more weeks left until school starts. And every year seems to be a little bit different, with a new routine to get used to.

I know I sure can use all the help I can get, with new recipe ideas that are quick, easy and most importantly, delicious! This week, I did a variation on the wraps section of Workman’s book. We love Caesar salads topped with chicken so when I discovered a similar chicken Caesar salad wrap at our local grocery store I had to try it! It was delicious and I thought to myself, this would be so easy to make for lunch for our own lunchboxes.

This Chicken Caesar salad wrap is a delicious sandwich wrap combining chicken lunch meat with a fresh Caesar salad! Perfect make ahead meal for lunch boxes!

My daughter especially loves this chicken Caesar salad wrap! The store-bought variety has a bit more lunch meat than we like, so that’s what is great about making our own…we can totally customize it. And that’s the tip that Workman gives…customize a wrap to make it your own!

The chicken Caesar salad wrap is pretty simple to put together and best of all, you can make them the night before!

Store in the refrigerator to put into a lunch tote before heading to school or work.

I also grate my own Parmesan cheese for these easy chicken wraps–you can find out how by checking out my post here. Yum!

Chicken Caesar Salad Wrap Recipe #SundaySupper

  • 1 medium size whole wheat tortilla
  • 3 slices of chicken lunchmeat (we like the Boar's Head rotisserie chicken)
  • 1 large leaf of green lettuce (washed)
  • 1-2 tablespoon grated or shredded parmesan cheese
  • 1-2 tablespoons prepared Caesar salad (commercially prepared or make your own)
  1. Spread dressing on entire tortilla. Sprinkle with paremesan cheese. Layer lettuce on tortilla and top with chicken slices on two-thirds of tortilla. Roll up one side then roll all ingredients up and secure with a toothpick if necessary. Enjoy!

Ingredients to make a chicken Caesar salad wrap

Just a few simple ingredients is all it takes to whip up this tasty chicken wrap!

making a chicken wrap sandwich

Spread the dressing on the tortilla first–then sprinkle on the cheese.

Chicken Caesar Salad Wrap

Layer everything on the tortilla–I kind of shift it to one side a bit (which this picture doesn’t really show but I do do it).

If you’re looking for some ideas to help you get family-friendly meals on the table this year, then be sure to check out The Mom 100 Cookbook. You can read my review of it here–it really is a great resource for tons of great recipes. Or check out the author’s blog for even more tips and recipes to get you started.

Lastly, be sure to join us this Sunday for #SundaySupper Around the Family Table with Katie Workman at 7pm ET. Katie is so much fun and will be sharing her Easy Back to School Recipes during our chat. And many thanks to Isabel at Family Foodie for starting the #SundaySupper movement and getting us all talking and sharing. We’d love for you to join us and share your tips and inspiration. Let’s make this the best school year yet for our kids!

In addition to the chicken Caesar salad wrap recipe, here are easy back-to-school recipes from the rest of the Sunday Supper members.

Easy Breakfast ideas:

Lunchbox Wraps:
Easy Weekday Suppers:
After School Snacks:

We will be sharing great family recipes all day and want you to share yours with us! Join us at 7pm ET for our #SundaySupper Chat with Katie Workman. Follow us on twitter by using hashtag #Sundaysupper or using Tweetchat. We love to feature your recipes on our #sundaysupper pinterest board and share them with all our followers.

The Mom 100 Cookbook

Disclosure: I have received a copy of The Mom 100 Cookbook and am an Amazon Affiliate (if you order a book from my site, I get a very, very small percentage). All opinions are my own!

This Chicken Caesar salad wrap is a delicious sandwich wrap combining chicken lunch meat with a fresh Caesar salad! Perfect make ahead meal for lunch boxes!

The post Super Simple Chicken Caesar Salad Wrap appeared first on Meal Planning Magic.

Viewing all 30 articles
Browse latest View live


Latest Images